How to Grow and Care for Crocosmia
Contents
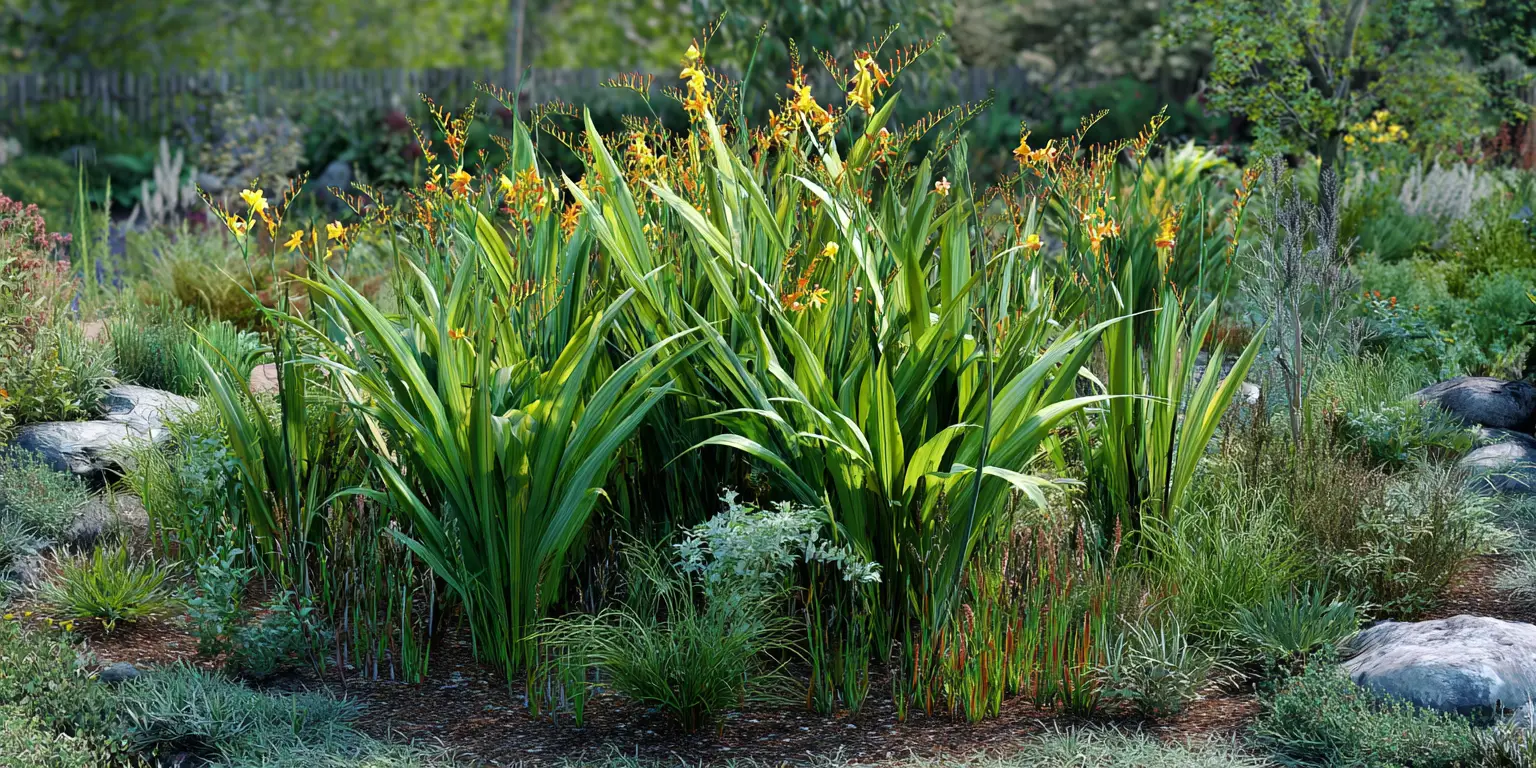
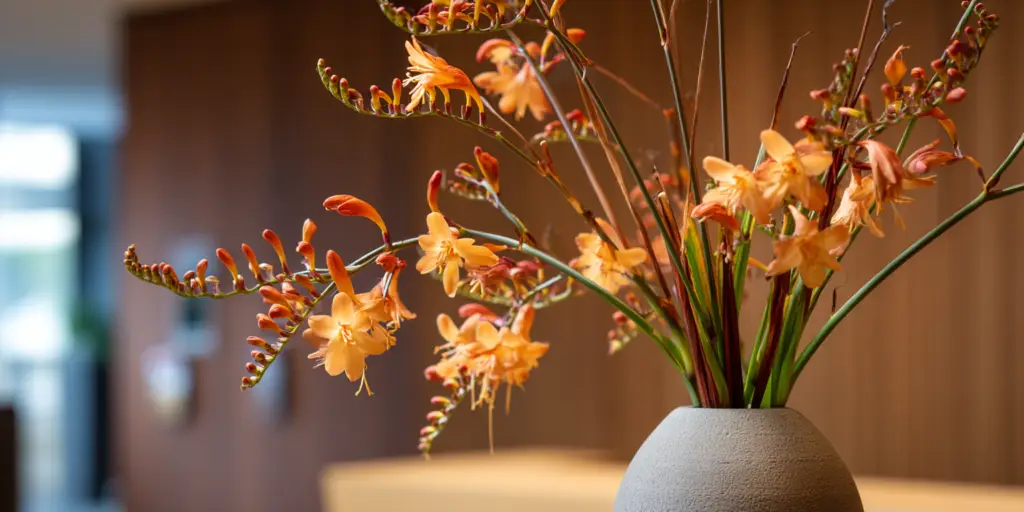
Crocosmia (accepted botanical name: Crocosmia spp.; common hybrids are Crocosmia × crocosmiiflora) are summer‑blooming perennials grown from bulb‑like corms. They produce upright fans of sword‑shaped foliage and arching stems lined with tubular blossoms that open from the base upward. Colors span fiery red to orange and golden yellow, with popular cultivars like ‘Lucifer’ making a dramatic midsummer show. In U.S. gardens you will also see the common names montbretia, coppertips, and falling stars. Crocosmia are reliable cut flowers, attract hummingbirds, and naturalize slowly by building a stack of new corms on top of last year’s corm. Choose them when you want bold, vertical texture and a long window of color between high summer and early fall. As a group, Crocosmia are hardy in USDA Zones 6 to 9, with cultivar and microclimate making the difference between surviving or not. In the coldest parts of Zone 6 and in Zone 5, some selections such as ‘Lucifer’ can overwinter if well mulched, but in many Zone 5 gardens the corms should be lifted and stored. Full sun drives the best bloom. In hot‑summer regions, offer light afternoon shade so the florets last longer and foliage stays crisp. In coastal or mild summer climates, plant in open sun to prevent lanky growth and reduced flowering. Pick a spot with well‑drained soil and six or more hours of sun. Plant corms after danger of frost when soil has warmed, at the correct depth, and water to establish even moisture. Mulch 2 to 3 inches thick to moderate heat and preserve soil moisture, but keep mulch back from the crowns. Feed sparingly based on a soil test. Deadhead spent flower spikes, let leaves ripen, and divide every few years when clumps get crowded. In cold winters, mulch heavily or lift and store corms for replanting next spring.
Soil & Bed Preparation
Crocosmia thrive in loam or sandy loam that drains readily yet holds even moisture. They resent waterlogged sites. If your soil is clayey, loosen a broad area 12 to 15 inches deep and incorporate well‑finished compost to improve structure and aeration. Where water lingers after storms, plant in raised beds 6 to 8 inches high so corms sit above periodic saturation. In arid climates, amend too‑rapidly draining sand with compost to improve water‑holding capacity. Good drainage is the single most important soil factor for long‑lived clumps and protection from corm rot. Aim for a soil that includes generous organic matter. Mixing in 2 to 3 inches of compost over the planting area before planting supports soil biology, helps smooth out moisture swings, and moderates temperature at the corm zone. In already rich beds, top‑dressing with 1 inch of compost each spring is usually enough. Over‑enriching with high‑nitrogen amendments can reduce flowering, so favor balanced or low‑nitrogen inputs and follow your soil test recommendations. Crocosmia tolerate a fairly broad pH range but flower best in slightly acidic to neutral soils. A practical target for home gardeners is pH 6.0 to 7.0. If your lab report shows pH below 6.0, incorporate lime based on the recommended rate. If pH is above 7.0 and plants show micronutrient issues, elemental sulfur can be used to move pH down gradually. Always adjust pH with reference to a current soil test and retest periodically. Dig a hole 12 inches deep and about 12 inches wide where you plan to plant. Fill it with water and let it drain completely. Refill once and time how fast the water drops. A percolation rate of about 1 inch per hour is acceptable. Slower than that means you should raise the bed, lighten the soil with coarse organic matter, or choose a different site. While you are preparing beds, send a soil sample to your local Cooperative Extension lab and adjust pH to the 6.0 to 7.0 target before planting. Recheck pH and nutrients every few years or after major amendments. Corms are living storage organs. They need oxygen around their base to avoid rot. Avoid compacted soils, do not plant in a sump or swale, and do not pile mulch or soil over the crown beyond the recommended planting depth. In heavy soils, create a shallow gravelly interface at the bottom of the planting hole only if drainage is proven poor; in most garden soils, amending the whole bed is more effective than layering in a single hole.

Planting Calendar by USDA Zone
Zones 9 to 8
Plant corms outdoors in spring after your last frost date when soil temperatures are consistently warm. Container‑grown plants can also go in during fall while the soil is still workable, which promotes a faster start next spring. In hot, dry inland areas, schedule planting as the season turns toward milder spring weather and irrigate consistently during establishment. Along the coast, spring planting is straightforward in full sun.
Zone 7
Plant corms from mid to late spring once frost danger has passed and the soil is warming. In warmer Zone 7 locations, earlier spring planting is fine if soils drain well. In exposed windy sites, wait until the forecast settles into a mild pattern. Containerized plants can be set out any time the soil is workable, avoiding summer heat waves.
Zone 6
Plant corms in late spring after frost when the soil has warmed. Choose the sunniest, most sheltered bed. Mulch well by early winter and consider an extra layer of straw for marginal cultivars. In northern Zone 6 or high elevations, treat Crocosmia like a semi‑tender bulb: plant late, choose hardy cultivars, and be ready to lift and store in a cool space if long cold snaps are expected.
Zone 5
Treat Crocosmia as tender unless you have a proven hardy cultivar and an exceptionally protected microclimate. Plant corms after frost and enjoy them as a summer display, or sink nursery containers into a bed for easier lifting. After frost blackens the tops, dig corms, cure, and store indoors. Replant the following spring.
Regional caveats
In hot‑humid regions, give Crocosmia full morning sun then light afternoon shade and steady moisture. In arid or high‑altitude gardens, irrigate deeply but infrequently once established, and mulch to slow evaporation. Coastal sites with cool summers often produce superb flowers but wind can tatter leaves, so select a spot with a windbreak or group plants to shelter one another.
Planting: Depth & Spacing
Set individual corms point up. In average garden soils, plant 3 to 5 inches deep for most cultivars and space 6 to 8 inches apart within the row. In colder climates or very sandy soils, hardy selections like ‘Lucifer’ benefit from deeper placement, about 5 to 8 inches, which stabilizes tall stems and offers a bit more insulation. Planting in groups of 10 to 15 corms produces the strongest visual impact and helps foliage hold each other upright. For mass plantings, leave 12 to 18 inches between groups for airflow and access. Dividing an older clump yields “stacks” of corms connected by a dried corm base. Replant divisions so the uppermost corm sits about 3 to 4 inches below the surface in mild climates and about 4 to 5 inches deep where winters are colder. Trim away the oldest, shriveled corms at the base before replanting. Water in carefully to settle soil around the roots and corms. Plant at the same depth as in the nursery pot. Loosen circling roots along the outer edge. Water the hole before and after planting to reduce transplant shock. For late spring or early summer installs, provide temporary shade cloth or use a lightweight plant umbrella during the first week, then gradually increase sunlight to full exposure. Do not fertilize at planting if a slow‑release fertilizer is already present in the potting mix. Hydrate plants the day before planting. Plant on a mild, overcast day when possible. Water deeply right after planting to eliminate air pockets. For the first 10 to 14 days, keep the root zone evenly moist and avoid dry‑down. If wind is persistent, place a short, unobtrusive ring support to prevent whipping while roots knit into the surrounding soil.

Watering & Mulching
Right after planting, keep the top 6 to 8 inches of soil consistently moist but never soggy for about 3 to 4 weeks, which encourages fast root growth. Once established, Crocosmia tolerate short dry spells, but they flower best with steady moisture during active growth. Check moisture by inserting your finger to the second knuckle near the base of the clump. If it feels dry, water deeply so moisture reaches the full rooting depth. In extremely hot, dry stretches, water in the morning so foliage dries promptly. Apply a 2 to 3 inch layer of organic mulch such as shredded bark, leaf mold, or pine needles around but not on the crowns. Keep mulch 2 to 3 inches back from stems to prevent rot and to discourage rodents. Mulch suppresses weeds, buffers temperature swings, and reduces watering frequency. In cold‑winter climates, a winter mulch of clean straw applied after the soil cools helps prevent freeze-thaw heaving. Pull the extra winter mulch back in early spring so new shoots emerge cleanly. During heat waves, a light afternoon shade from nearby shrubs or a portable shade screen keeps flowers from fading and reduces foliage scorch. Increase watering frequency temporarily while maintaining good drainage. Focus on deep soakings rather than frequent splashes. Avoid overhead irrigation late in the day in very humid climates since leaves that stay wet overnight can invite spots and blights. Avoid watering with salt‑softened household water, which can add sodium to the soil over time. If your home uses a water softener, collect rainwater or use an outdoor spigot that bypasses the softener. To reduce accumulated salts, irrigate occasionally with plain, unsoftened water to leach the root zone.
Feeding
Let your soil test lead. In average garden soils, Crocosmia need modest fertility. At planting time, mix compost into the bed. If a soil test shows low phosphorus or potassium, lightly incorporate a bulb‑type fertilizer such as 5‑10‑10 into the top few inches of soil before planting or side‑dress in spring as shoots reach 6 to 8 inches tall. Excess nitrogen pushes leaves at the expense of flowers, so keep N on the low side. In lean soils a single light feeding in spring is enough. Many well‑prepared beds need no fertilizer beyond compost top‑dressing. Slow‑release granular products provide a steady trickle of nutrients; organic options such as compost and bone meal can also fit a bulb program when a soil test indicates a need. Scratch dry materials into the top inch of soil and water in. Avoid placing fertilizer directly against corms. Do not fertilize late in the season; plants are better off ripening naturally for winter. Aim to maintain organic matter and living roots in the bed across the year. Mulch and periodic compost additions support microbial activity that cycles nutrients and improves tilth. Retest sandy garden soils every two to three years and heavier soils every three to four years, or sooner if you correct a major pH issue or suspect a deficiency. If a lab report comes back high in P and K, skip fertilizer and rely on compost only.
Pruning & Support
Remove spent flower spikes near their base as the last florets finish. This tidies the clump and redirects energy into the corms rather than seeds. Leave the green leaves in place until they turn tan in fall; they photosynthesize and recharge the corm for next year’s bloom. Cut back browned foliage to ground level after frost or in very late fall in warm climates. Tall cultivars like ‘Lucifer’ may lean on windy sites or in rich soils. Install a discreet ring support or a low grow‑through grid in spring while shoots are short, or weave a single strand of natural twine around a group to encourage them to stand together. Planting in generous drifts also helps stems support each other. Wipe pruners and knives with isopropyl alcohol between clumps to reduce the chance of spreading pathogens. If you have been cutting any suspiciously spotted or rotted tissue, clean with a 10 percent bleach solution, rinse, and dry tools before storing.
Overwintering
In Zones 6 to 9, Crocosmia usually overwinter well in the ground. After frost, remove spent stems and apply 3 to 4 inches of loose organic mulch over the root zone once the soil cools. In exposed locations or marginally hardy cultivars, mound straw or pine needles 4 to 6 inches deep over the clump after the ground firms up. Pull mulch back gradually in spring so emerging shoots are not blanched. In Zone 5 and colder, or where soil stays wet in winter, dig corms after frost blackens foliage. Gently shake off soil and cure corms in a warm, airy place for one to two weeks. Remove and discard the oldest, shriveled corms at the base. Store healthy, firm corms in a breathable box or mesh bags packed in dry peat moss or vermiculite at 35 to 45°F (1.5 to 7°C). Check monthly. If they desiccate, lightly mist the packing medium. If any rot appears, discard affected corms before it spreads. Where voles or mice are an issue, avoid thick winter mulch piled right against crowns and consider a hardware‑cloth cloche over particularly valuable clumps. Stored corms should be kept in rodent‑proof containers and spaces.
Growing Environments
Crocosmia grow well in large containers with excellent drainage. Choose a pot at least 12 inches wide and 12 inches deep for a compact show, using a high‑quality peat‑based potting mix. Plant corms about 2 inches deep in containers and 1 to 2 inches apart for a full look. Ensure the pot has ample drainage holes and set it where it gets full sun. Water thoroughly when the top inch of mix dries, and never leave the container standing in a saucer of water. In cold climates, move the pot to a sheltered, unheated garage that does not freeze, or lift and store the corms. Shelter beds from strong, desiccating winds which can shred leaves and topple tall scapes. In heat‑reflective sites along south‑facing walls or stone, provide afternoon shade or use lighter mulches to keep the root zone cooler. In shade‑leaning gardens, grow Crocosmia where they receive morning sun and bright open shade in the afternoon; they will flower less than in full sun but still offer striking foliage and some bloom.
Companion Planting & Design
Crocosmia’s fiery palette pairs beautifully with blue and purple neighbors that calm and frame the glow. Try spires of salvias, violet asters, or airy ornamental grasses. For a cottage border, weave Crocosmia through a mid‑border matrix that includes late daylilies and coneflowers so the arching flower wands play across rounder flower forms. Where you want a blaze of warm color, group Crocosmia with black-eyed Susans and tall garden phlox, then cool the edges with blue catmint. Foliage remains attractive through much of the season, but in colder climates the clump can look tired after a hard frost. Place companions that surge late, like hardy chrysanthemums or fall anemones, just forward of Crocosmia to cover the decline. For spring‑to‑fall continuity, the area can host spring bulbs that die back before Crocosmia rise, then a summer‑to‑fall sweep of orange‑red fireworks. Hummingbirds, bees, and butterflies readily work Crocosmia spikes. Plant in drifts of one cultivar for concentrated nectar. Surround them with additional nectar sources such as agastache, mountain mint, or native asters to keep pollinators onsite from midsummer into fall. Allow 12 to 18 inches between clumps for good air movement in humid climates. This spacing reduces leaf spotting and helps stems dry after rain. In windy gardens, repeating clumps every 18 to 24 inches in a broken row provides self‑support without a solid sail that catches gusts. The common hybrid Crocosmia × crocosmiiflora can naturalize by seed and cormels in some mild, coastal regions. Where that is a concern, deadhead to prevent seed set, keep divisions contained, and do not discard corm‑containing soil into wildlands. Choose well‑behaved cultivars and monitor edges of plantings if you garden in climates known for easy naturalization.
References
- North Carolina State University Cooperative Extension. “Crocosmia (Coppertip, Crocosmia, Falling Stars, Montbretia).”
- North Carolina State University Cooperative Extension. “Crocosmia ‘Lucifer’.”
- University of Florida IFAS Extension, Nassau County. “Fact sheet: Crocosmia.”
- Missouri Botanical Garden Plant Finder. “Crocosmia ‘Lucifer’.”
- Missouri Botanical Garden Plant Finder. “Crocosmia × crocosmiiflora ‘Solfatare’.”
- Royal Horticultural Society. “How to grow crocosmias.”
- University of Wisconsin–Madison Division of Extension. “Storing Tender ‘Bulbs’ for Winter.”
- Iowa State University Extension and Outreach. “Using Mulch in the Garden.”
- University of New Hampshire Extension. “Garden Mulches.”


Written by: Your Flowers Guide editorial team
We are a small independent group of flower lovers who research and review each guide using trusted horticultural and educational sources. Learn more about us