How to Grow and Care for Balloon Flowers
Contents
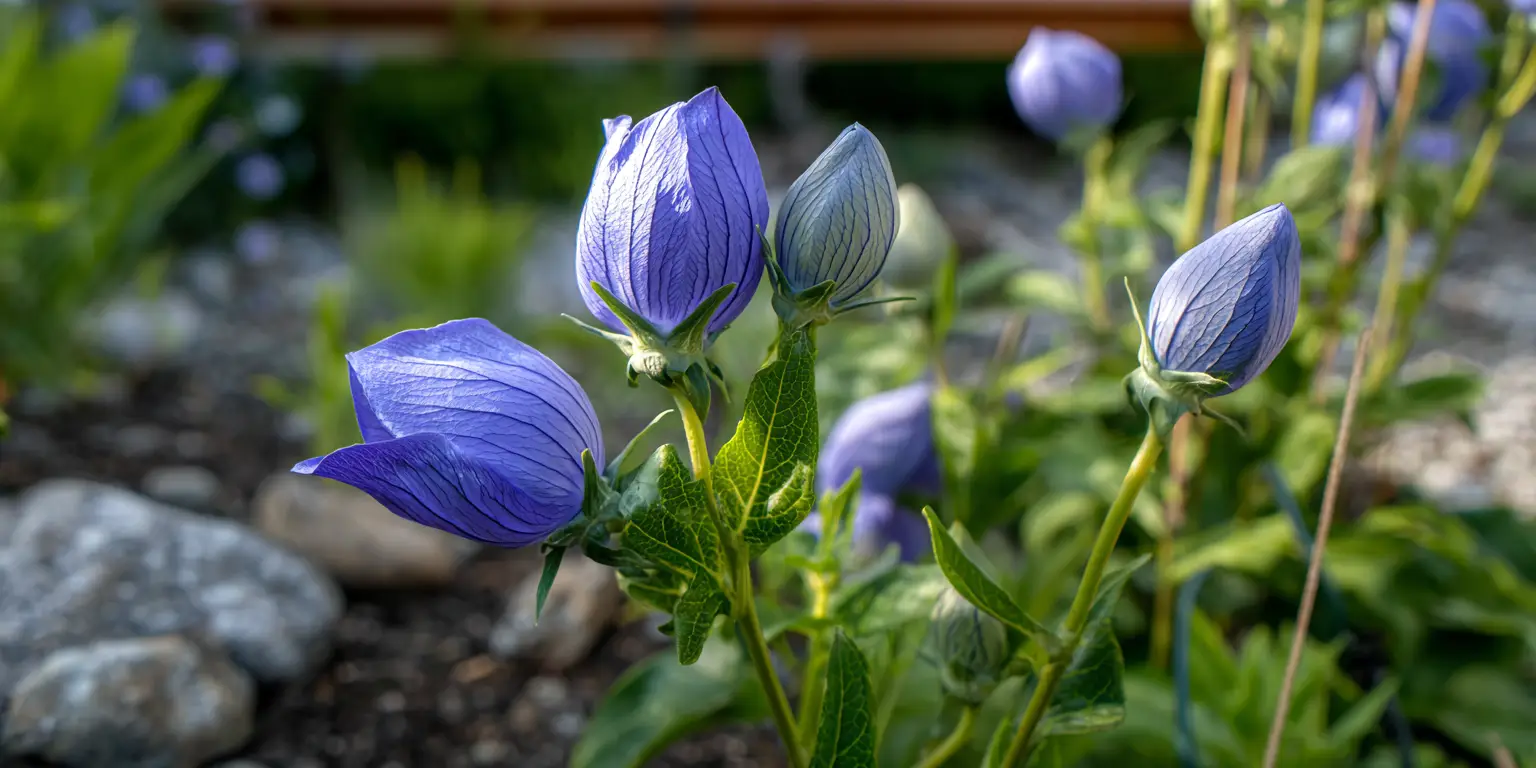
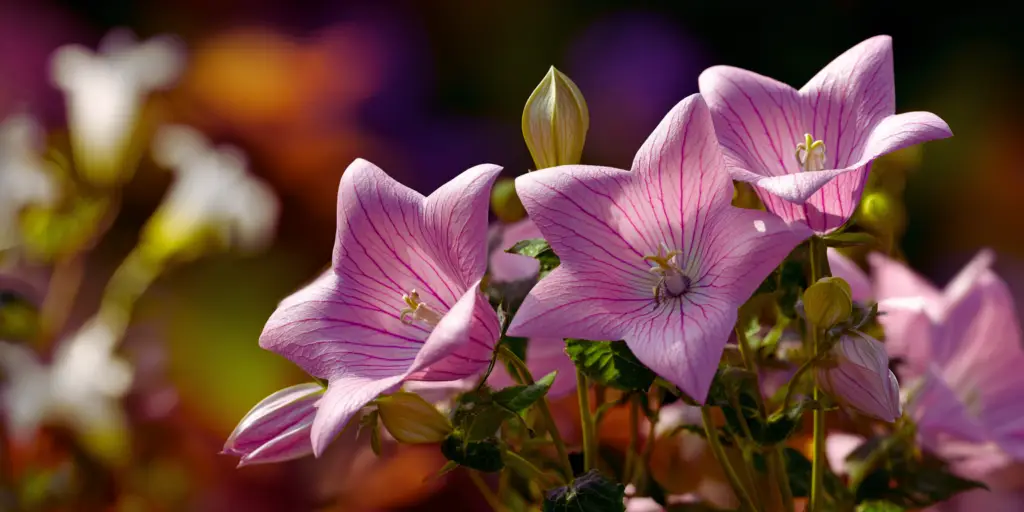
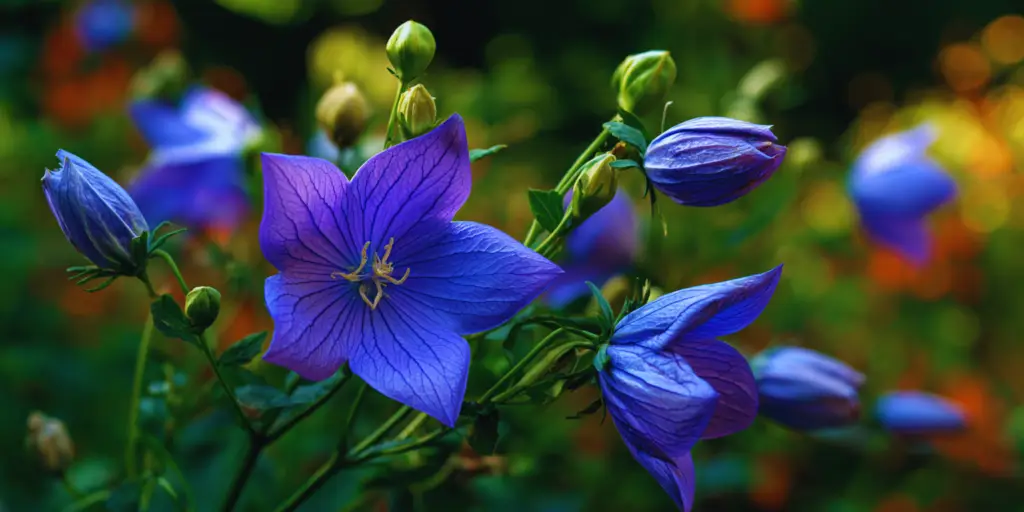
Balloon Flowers grow from a fleshy, carrot‑like taproot and form tidy clumps of upright stems. Plants typically reach 12 to 24 inches tall (30 to 60 centimeters), with dwarfs closer to 8 inches (20 centimeters) and taller selections approaching 30 inches (76 centimeters). The foliage is blue‑green and clean looking. The buds swell to round balloons, then open into five‑pointed blooms that can be single or double. Blooms are often deep blue violet, with white and pink forms available. In general garden use, Platycodon grandiflorus is hardy through cold northern winters and stands up to summer heat when drainage is sharp. Expect reliable performance in a broad slice of the country when winter lows are severe and soils do not remain waterlogged. Once established, plants can live many years with minimal division or disturbance. Provide full sun for six or more hours daily in regions with mild to moderate summers. Where summers are hot and bright, aim for morning sun with light afternoon shade. Dense shade reduces bloom, and deep shade can encourage floppy growth. Choose a spot with loose, well drained soil. Set container‑grown starts at the same depth they grew in their pots. Water consistently the first growing season, then shift to a deep, infrequent schedule. Mulch with a thin layer that does not touch the crowns. Deadhead to extend bloom and avoid frequent digging since the taproot resents disturbance.
Soil & Bed Preparation
Balloon Flowers prefer loamy or sandy loam soil that drains well yet holds even moisture. Heavy clay causes slow growth and increases the risk of root rot. If you garden in clay, loosen a wide area to at least 12 inches deep (30 centimeters) and work in coarse compost. Where clay is severe, consider a raised bed filled with a high‑quality garden mix based on compost, bark fines, and mineral aggregates. Aim for 4 to 6 percent organic matter in the top 6 to 8 inches of soil (15 to 20 centimeters). Blend in 1 to 2 inches of finished compost before planting. Avoid peat‑only amendments that collapse and hold excessive water. A blend that includes composted bark or perlite improves both air space and drainage. To check drainage, dig a hole 12 inches deep and 12 inches wide. Fill it with water and allow it to drain. Refill and measure the drop in water level after one hour. A drop of about 1 inch to 2 inches per hour indicates acceptable drainage. Less than 1 inch per hour means you should loosen the soil further or switch to a raised bed.
For pH, aim for slightly acidic to nearly neutral soil, about 6.0 to 7.2. If a soil test shows pH below 6.0, add finely ground limestone based on test recommendations. If pH is above 7.2, work in elemental sulfur or acidic organic matter such as pine bark. Always follow laboratory guidance for rates, and retest after one growing season. Raised beds warm earlier in spring and shed excess water, which Balloon Flowers appreciate. In‑ground sites perform well where soil is naturally well drained. Avoid low pockets where winter wet lingers. If you must use a low spot, build the bed higher than the surrounding grade and ensure the surface drains away from crowns.

Planting Calendar by USDA Zone
Balloon Flowers are usually sold as container‑grown perennials. They can also be grown from seed or from carefully taken divisions of older clumps. Plant when soil is workable and not waterlogged. If your region has intense summer heat, avoid the hottest weeks for transplanting.
Zones 3 to 4
Plant container‑grown starts after soil is workable and the danger of deep freeze has passed, typically late April to late May. Spring planting is preferred. Fall planting is possible from late August to mid September if you water well and mulch lightly, but spring gives the best margin for root establishment before winter.
Zones 5 to 6
Plant container‑grown starts in mid April to early June. Fall planting works from early September to early October. For seed, start indoors 6 to 8 weeks before your average last frost. Harden off for 7 to 10 days before setting plants outside. Divisions are best made in early spring when new shoots are just visible and soil is moist.
Zones 7 to 8
Plant in early spring from late February to April, or in fall from October to early December where soil stays workable. Favor morning sun with afternoon shade to prevent stress during the hottest months. Avoid planting during extended heat waves. Seed can be sown indoors in late winter for spring transplanting.
Special regions
Hot humid coasts: provide excellent air flow, avoid heavy clay, and use morning sun with afternoon shade.
Arid interiors: rely on drip irrigation that delivers deep, infrequent watering and mulch with small gravel or composted bark to moderate temperature swings.
High elevations: spring planting is best. Choose sites with full sun and well drained soils to maximize the shorter season.
Planting: Depth & Spacing
Sow indoors 6 to 8 weeks before the average last frost. Use a sterile, well drained seed mix. Press seeds onto the surface since they require light to germinate, and mist to settle. Maintain 65 to 70°F (18 to 21°C). Expect germination in about 14 to 21 days. Transplant to cell packs when seedlings have two true leaves. Harden off for a week before planting outdoors. Outdoors, direct sow after frost in prepared beds. Keep evenly moist until seedlings establish. Balloon Flowers dislike disturbance because of their fleshy taproot. Divide only mature clumps that have several strong shoots. Do this in early spring while growth is just starting. Use a clean, sharp spade to split the clump into large pieces with at least two shoots and a good section of root. Trim damaged roots cleanly. Replant immediately. Plant at the same depth as in the nursery pot. Do not bury the crown. Gently loosen the outer roots if pot‑bound. Place plants 12 to 18 inches apart (30 to 45 centimeters) to allow airflow and room to fill in. In small borders or in front of shrubs, set rows 18 to 24 inches apart (45 to 60 centimeters). Water thoroughly after planting to settle the soil around the roots. Acclimate plants by placing them outside in bright shade for two days, then gradually increase sun exposure over a week. Plant on an overcast day or in late afternoon. Water in with clear water. Where wind is strong, use temporary low hoops or a short fence to break gusts for the first week.

Watering & Mulching
In the first growing season, keep soil evenly moist but never waterlogged. Water deeply once or twice per week depending on rainfall. A deep soak that moistens the top 8 inches of soil (20 centimeters) encourages the taproot to drive downward. Check moisture by inserting a finger into the soil. Water again when the top 2 inches feel dry. Once established, Balloon Flowers are moderately drought tolerant in average garden soil. Shift to deep, infrequent watering. During summer dry spells, supply roughly 1 inch of water per week from rain or irrigation. In sandy soils, you may need two smaller soakings to achieve the same depth without runoff. Avoid frequent light sprinklings that promote shallow roots. Mulch with 1 to 2 inches of composted bark, shredded leaves, or fine wood chips. Keep mulch 2 inches away from the crowns to prevent rot. In very hot regions, a thin gravel or stone mulch can reflect heat upward, so prefer organic mulches that moderate surface temperature and improve soil biology over time. Increase watering frequency during multi‑day heat events and monitor soil moisture closely. Add temporary shade cloth in the hottest afternoon hours if plants flag. A light midseason top‑dress with compost improves water holding capacity. Avoid overhead watering late in the day to reduce disease risk. Hard water is usually acceptable. If you garden near the coast or irrigate with salty water, avoid pooling and leach salts periodically with a long, deep soak that allows excess water to drain away.
Feeding
Balloon Flowers are light feeders. Overfertilizing encourages soft growth that flops. In average soil, feed once in early spring as new growth emerges. In very lean soil, repeat lightly after the first flush of bloom. Choose a balanced, slow‑release fertilizer in the general range of 5‑5‑5 to 5‑10‑5. Apply at the lower end of label rates for perennials. For organic options, top‑dress with 1 inch of compost in spring and scratch in a handful of slow‑release organic fertilizer around each plant. Water after feeding. If plants are lush and flower well, skip feeding that year. After planting in soil amended with compost, you often do not need fertilizer until the second growing season. Avoid high nitrogen lawn fertilizers, which encourage weak, tall growth. Maintain living soil by adding modest organic matter each year. Avoid compacting wet beds. Where a soil test shows nutrient surpluses or pH drift, correct the underlying issue and retest in one to two years rather than layering on extra fertilizer.
Pruning & Support
Remove spent flowers to prolong bloom and neaten the plant. Snip just above the next set of leaves. When the first flush ends, you can cut stems back by one third to encourage a fresh set of buds. Late in the season, allow some pods to mature if you want seed to self‑sow modestly. A light pinch in late spring when stems are 8 to 10 inches tall can encourage branching and reduce the need for staking in taller varieties. Avoid pinching too late, since that can remove forming buds. Most dwarf and mid‑border selections stand on their own. Taller selections may lean in rain or wind. Use a low ring support or discreet twiggy stakes installed early so stems grow through them naturally. Place supports 6 to 8 inches from the crown to avoid crowding. Clean pruners and stakes before use and between plants. Wipe blades with 70 percent alcohol or a 10 percent bleach solution. Allow tools to dry before making cuts. Good hygiene lowers the risk of spreading fungal and bacterial issues.
Overwintering
After frost blackens foliage, cut stems to just above ground level and clear debris. When the ground is cold but not yet frozen, apply 2 inches of organic mulch over the root zone. In very cold regions, wait until the ground freezes, then add mulch to moderate freeze and thaw cycles. In spring, pull mulch back from crowns as shoots emerge. The fleshy taproot dislikes standing water during winter. Ensure beds shed water. Avoid heavy, soggy soils that push crowns upward during alternating freeze and thaw. If heaving occurs, gently press plants back into place when the soil softens. Where voles or other rodents are active, avoid deep straw that creates winter cover for pests. A thin layer of shredded leaves or composted bark is safer. Keep nearby turf mowed short heading into winter. In zones with severe freezes, move containers to an unheated garage, cold frame, or sheltered porch where temperatures stay between 25 and 40°F (−4 to 4°C). Water sparingly to keep the mix just barely moist. In milder zones, cluster pots against a south‑facing wall and wrap the container with burlap or bubble wrap to buffer temperature swings.
Growing Environments
Balloon Flowers grow well in containers if given depth for the taproot. Use at least a 3‑gallon pot for dwarf selections and 5 gallons or more for standard varieties. Choose pots at least 12 inches deep (30 centimeters) with generous drainage holes. Unglazed clay breathes but can dry quickly in hot weather, so monitor moisture. Use a high‑quality potting mix that drains rapidly. A blend with peat or coir, composted bark, and perlite works well. Avoid mixes that hold water too tightly. Elevate pots slightly on feet so water can escape freely. Where reflected heat is intense, keep containers a few feet from south‑ or west‑facing walls. In windy balconies or rooftop gardens, group pots to reduce wind stress and retain humidity. In shadier yards, position near bright, open areas with morning sun. Rotate pots monthly for even growth. Container soil warms and dries faster than in‑ground beds. Water when the top inch is dry. During heat waves, daily checks are wise. Fertilize sparingly with a balanced, slow‑release product applied in spring, then use a dilute liquid feed once during peak growth if foliage pales.
Companion Planting & Design
Balloon Flower’s cool blossoms link beautifully with summer perennials. Pair blue selections with white daisies and silver foliage for a fresh border. Combine pink or white forms with soft pastels for cottage beds. To guide readers toward deeper planning resources, the bold anchor phrases in this section map to our main guides and hubs for future internal links. Add Balloon Flowers to mixed borders alongside blue, white and purple flowers for a calm palette, or weave pink forms into beds that feature pink flowers. For broader inspiration, explore plant lists within types of flowers and seasonal ideas from our wedding flowers guide. For shrubs behind a Balloon Flower edge, hydrangeas add scale and contrast, especially hydrangea macrophylla. Along paths, aromatic accents like lavender provide texture and scent without overshadowing the starry bells.


Written by: Your Flowers Guide editorial team
We are a small independent group of flower lovers who research and review each guide using trusted horticultural and educational sources. Learn more about us