How to Grow and Care for Yarrow
Contents
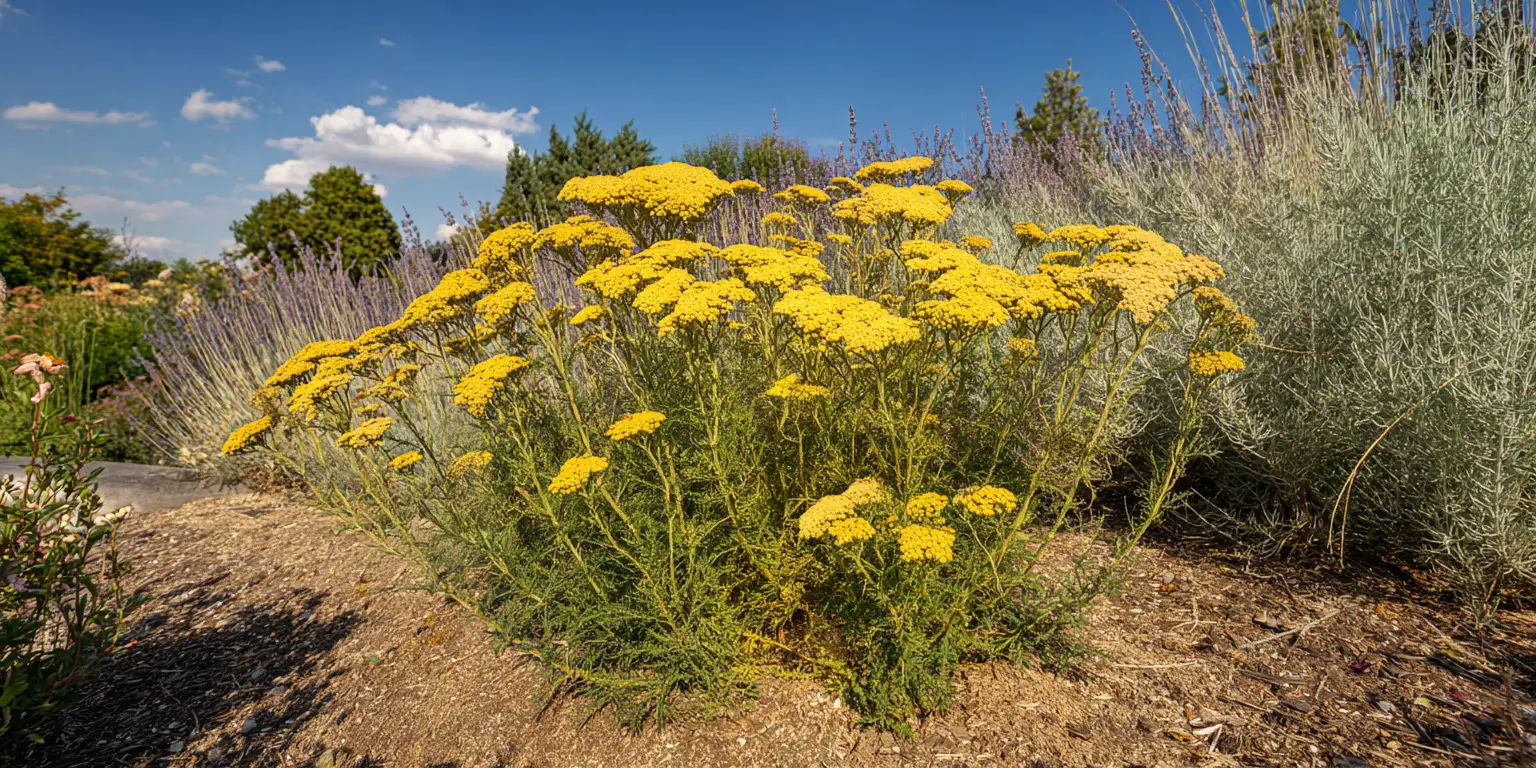
Yarrow is a tough, sun loving perennial valued for flat clusters of tiny flowers above fernlike foliage and a long, steady summer show. The accepted botanical name for common yarrow is Achillea millefolium. Garden selections of fernleaf yarrow are usually Achillea filipendulina, and pearl yarrow is Achillea ptarmica. Common names include common yarrow, fernleaf yarrow, and pearl yarrow. Most yarrow types thrive in USDA Zones 3 to 9 depending on species and cultivar. They prefer full sun with at least 6 hours of direct light each day. Give yarrow a lean, well drained soil and it will reward you with abundant blooms and sturdy stems. Success with yarrow is simple. Start with bright sun, improve drainage if your soil stays wet, water to establish then water sparingly, and deadhead through summer to keep the flowers coming. Yarrow care is truly low effort once plants settle in during the first season.
Yarrow forms a fibrous root system with short rhizomes that allow clumps to widen steadily over time. That spreading habit makes yarrow a reliable filler for new beds and a good choice for water wise landscape designs. At the same time, lean soil is important because rich soil encourages sprawling growth and weak stems that flop. Flower colors range from white and cream to yellow, gold, apricot, salmon, pink, and soft red, with foliage that is typically gray green. Common yarrow often reaches 18 to 30 inches tall, while fernleaf selections can grow 36 to 48 inches tall. Dwarf cultivars stay closer to 12 to 18 inches. This range lets you match the right type to the front, middle, or back of a border without fuss.
Yarrow’s bloom season typically runs from early summer into late summer and sometimes early fall with regular deadheading. Flat umbels provide excellent landing pads for pollinators including bees, hoverflies, and butterflies. The flowers are also good for cutting and drying. Fresh stems hold in water for about a week when cut just as the outer florets open. Drying is easy because the flowers retain color well when hung upside down in a warm, airy space. If deer and rabbits trouble your garden, yarrow’s fragrant foliage is usually unappealing to them, which adds to its reliability in mixed plantings that include many types of flowers. In short, yarrow care centers on sun, drainage, and modest water. Those are the pillars of success for this durable perennial.
Soil & Bed Preparation
A site with free draining soil is the most important foundation for healthy yarrow. Think average to lean texture with plenty of air space in the root zone. Loams and sandy loams are ideal. In heavier clay, loosen the top 12 to 14 inches and blend in coarse sand or fine gravel along with compost to improve structure. Use no more than one part compost to three parts native soil so you do not create a rich bed that leads to floppy growth. Yarrow tolerates a wide pH range but performs best from about 6.0 to 7.5. In coastal gardens where alkaline soils are common, yarrow usually grows well without special adjustment. If your ground stays wet after storms, consider a berm or a raised bed so roots never sit in water during winter or spring.
Raised beds offer a simple solution where drainage is a constant challenge. Build a mound or a framed bed 6 to 12 inches high and fill with a mix of native soil, coarse sand, and a small amount of compost. Aim for a mix that feels gritty when squeezed and falls apart quickly. Avoid rich bagged mixes formulated for vegetables. Yarrow is a light feeder and responds to fertile soils with soft, weak stems. When converting lawn to a yarrow border, remove turf and loosen compaction before planting. In arid regions, add shredded leaf mold or fine bark to slow the speed of drainage so the root zone holds enough moisture for establishment. In humid regions, emphasize mineral amendments so the bed dries quickly between rains.
Drainage Test and pH Targets. To test drainage, dig a hole about 12 inches wide and 12 inches deep and fill it with water. Let it drain completely, then refill. Measure the drop over one hour. A percolation rate of about 1 to 2 inches per hour is good for yarrow. Less than 1 inch per hour means you should raise the bed or amend more aggressively. More than 4 inches per hour suggests very fast sand where initial watering during establishment will be important. To confirm soil pH, use a home test kit or send a sample to your state Cooperative Extension soil lab. If pH is below 6.0, a light application of garden lime will move the soil toward neutral. If pH is above 7.5, elemental sulfur can be used, although yarrow usually tolerates slightly alkaline soils without complaint.

Planting Calendar by USDA Zone
Yarrow is most dependable when planted in cool weather so roots grow before summer heat arrives. In cold winter zones 3 to 4, plant container yarrow as soon as the ground can be worked in spring, usually April to May, then again in late summer to early fall about August to September. Spring planting allows plenty of time for establishment. Fall planting offers quick root growth in cooling soil, followed by a winter rest. In these colder zones, seed can be sown outdoors in early spring once soil temperatures reach about 65°F (18°C).
In zones 5 to 6, spring planting runs from March to May, depending on your last frost. Fall planting works from late August through October while soil still holds warmth. Divisions taken from established clumps settle quickly in these windows. If you garden in a region with hot and humid summers, choose spring. That gives plants a head start before humidity increases disease pressure. Seed can be started indoors 6 to 8 weeks before the last frost, then transplanted after danger of hard frost passes.
In zones 7 to 8, fall planting is preferred. Plant from September to November so roots establish in mild weather. Spring planting from February through April is also successful, especially where summers are not extremely humid. In the Southeast where humidity is high, select cultivars noted for stronger stems and give extra space for air flow. Seed can be sown in fall for natural cold stratification, or started indoors in late winter and set out after the last frost.
In zone 9, choose very early spring or fall. Plant from October to December where winters are mild, or plant in February to early March before heat builds. Summer planting is not recommended because high heat at transplant time can stress young plants. Seed is best sown in fall or very early spring. In coastal areas with steady breezes, plan for wind exposure by staking tall types the first season and by spacing more generously.
Planting: Depth & Spacing
Seeds. Yarrow seed germinates in light and warmth. Indoors, sow in trays 8 to 10 weeks before outdoor planting. Press seed onto the surface of a sterile seed starting mix and cover very lightly with about 1/16 inch of fine medium, or simply press and mist so seed has firm contact. Maintain 65 to 70°F (18 to 21°C). Expect germination in 7 to 14 days. Harden off seedlings for 7 to 10 days by placing trays in bright shade outdoors for a few hours each day, gradually increasing sun. Transplant when seedlings have 2 to 3 sets of true leaves. Outdoors, broadcast seed on a prepared, weed free surface in early spring or fall and rake lightly so seeds make contact. Keep the surface evenly moist until seedlings establish.
Bare‑Root or Divisions. Yarrow divides easily. In early spring or early fall, slice a vigorous clump into hand sized pieces with several shoots and a healthy set of fibrous roots. Replant divisions so the crown sits level with the surrounding soil. Water to settle soil around roots, then mulch lightly. Divisions are a good way to maintain vigor in older plantings and to keep spreading types within bounds. Dividing every 3 to 4 years is a common rhythm in average garden soil. Mark the original footprint and replant only the best pieces within that space to control drift into adjacent plants.
Container‑Grown Plants. Transplant from nursery containers on a cool, bright day. Water the plant in its pot so the root ball is evenly moist. Slip the plant from the container and loosen circling roots gently. Set the crown level with the soil surface and firm the soil without compacting it. Space compact A. millefolium 12 to 18 inches apart and tall A. filipendulina 18 to 24 inches apart. In mass plantings, allow 24 to 30 inches between rows for access and to encourage air flow. After planting, water slowly until the top 6 inches of soil are moist. Shade with a lightweight row cover for three to four days in bright, hot weather to reduce transplant shock, or plant in the late afternoon so roots can recover overnight.

Watering & Mulching
Yarrow needs consistent moisture only while it establishes. During the first six weeks, water deeply once or twice per week to deliver about 1 inch of water, which equals 0.6 gallons per square foot. Use a finger to check moisture at 2 inches depth. Once plants are rooted in, gradually reduce to deep, infrequent watering. In typical summer conditions, a deep soak every 10 to 14 days is adequate, and natural rainfall often covers that. In prolonged drought, watch foliage. Leaves that lose their spring and snap indicate the need for a slow soak. Overwatering is the most common cause of weak growth and lodging, so always allow the top few inches to dry between waterings.
Mulch helps moderate soil temperature and reduces weed competition, but the type and thickness matter. Apply a very light 1 to 2 inch layer of shredded leaves, pine needles, or fine bark, and pull the mulch 2 inches back from the crown so it stays dry. In very wet climates, a thin layer of pea gravel or crushed stone works even better because it dries quickly and discourages rot around the crown. After heavy storms, feel the soil under mulch. If it is saturated for more than a day, loosen the mulch temporarily so air reaches the surface faster. In heat spikes above 95°F (35°C), a morning soak and temporary afternoon shade cloth can prevent stress in newly planted yarrow.
Feeding
Yarrow is adapted to lean ground. In many gardens, fertilizer is unnecessary and can be counterproductive. Apply compost as a thin topdressing in spring at no more than one half inch depth to feed soil life and improve structure without pushing soft top growth. If a soil test indicates a nutrient deficiency, choose a low nitrogen fertilizer so stems remain sturdy. A formulation such as 5 to 10 to 5 or similar can be used at the lightest label rate in early spring only. Skip midsummer feeding because it tends to reduce flower quality and encourages flopping. Recheck soil with a lab test every two to three years if you are adjusting pH or rebuilding a compacted site.
Organic matter is useful in moderation. Aim for a soil that feels friable and crumbles easily rather than rich and spongy. If you regularly use bark or leaf mulches, they will contribute enough slow feed for yarrow over time. In new raised beds built with bagged mixes, dilute the mix with mineral soil and coarse sand so the bed is not overly rich. Where plants show lush foliage with few blooms, stop all feeding and consider lifting in fall to add mineral grit under the clump. That small change often restores balance the next year.
Pruning & Support
Deadheading keeps yarrow blooming and maintains tidy clumps. As individual flower heads fade, cut back to the first side shoot with buds. When a flush of blooms finishes, shear the top third of the plant to stimulate new stems and a second bloom period. In late fall after hard frost, or in very early spring before new growth starts, cut stems down to 2 to 3 inches. Removing old growth improves air flow and lowers disease pressure when the season starts. If you prefer to leave seed heads for winter structure and birds, wait to cut back until late winter in colder zones, then clean up before new shoots elongate.
Tall selections, especially fernleaf yarrow, may need support in fertile soil or windy exposures. Place a ring stake or a low grid support in spring before stems stretch so growth can fill the support naturally. Pinching can also help. In mid spring when stems are 8 to 10 inches tall, clip out the growing tips of the tallest shoots to encourage branching and shorter, sturdier flower stems. When pruning, keep tools clean and sharp. Wipe blades with 70 percent isopropyl alcohol between plants and after any cut that contacts suspect tissue. Clean tools reduce the spread of common foliar diseases and improve cut quality.
Overwintering
Most yarrow is reliably hardy in its recommended zones. In cold winter climates, the main goal is to prevent crowns from staying wet during freeze and thaw cycles. After the soil cools in late fall, apply a 2 inch blanket of shredded leaves or pine needles around the base of plants, keeping the crown itself open. This light mulch buffers temperature swings without trapping moisture. Where voles are active, avoid thick mulches that invite tunneling. If rodent pressure is severe, lay a sheet of quarter inch hardware cloth flat on the soil when planting and cut holes for crowns, or plant divisions in small collars of hardware cloth below the surface.
Container grown yarrow needs extra attention in winter, because roots in pots are more exposed to cold than roots in the ground. In zones 3 to 5, move containers into an unheated garage or a sheltered porch after a few hard frosts. Water lightly once a month so the root ball does not dry out completely. In zones 6 to 7, containers can overwinter outdoors if the pot is at least 12 inches wide and set on feet or bricks to keep drainage holes open. Cluster pots against a south facing wall and wrap the group with burlap if winter winds are strong. Remove winter cover in early spring after the worst freezes have passed.
Growing Environments
Yarrow grows well in containers as long as the mix drains quickly and the volume is adequate. Use a pot that holds at least 3 gallons for compact selections and 5 gallons or more for tall types. Depth should be about 12 inches to give roots room to spread. Choose a bark based potting mix or a general purpose soilless mix amended with extra perlite or coarse sand. Terracotta pots help because they breathe and dry faster after summer storms. Water when the top 2 inches are dry. Avoid saucers that trap water under the pot. Feed containers lightly once in spring with a low nitrogen slow release fertilizer if a soil test is not practical.
In the ground, microclimates can fine tune performance. In the high plains and interior West, where days are hot and nights are cool, yarrow thrives in full exposure with reflective heat from stone or gravel. In the Southeast, choose a site with steady morning sun and light afternoon shade to limit heat stress, and leave more space between clumps for air flow. On windy coastal sites, stake tall selections early the first season, then allow clumps to thicken and self support in following years. Along sidewalks or driveways that radiate heat, increase mulch thickness slightly in summer and water the evening before a forecast heat wave to reduce stress on newly planted yarrow.
Companion Planting & Design
Yarrow’s flat, matte flower heads and fine textured foliage play well with many companions. For bright, sunny borders, pair yellow or gold yarrow with blue or violet perennials to balance the palette. Salvias, ornamental sages, and hardy geraniums are reliable partners. Silver foliage plants such as artemisia or lambs ear echo yarrow’s leaves and make a cohesive composition. If you want a meadow effect, combine yarrow with grasses like little bluestem and prairie dropseed so the flowers seem to float. In mixed borders that feature yellow flowers, blue flowers, white flowers, and pink flowers, yarrow often becomes the bridge that ties strong colors together while providing a long season of interest.
Companion choices can also serve practical goals. Plant yarrow near upright roses to fill space at their feet and to offer pollinator habitat that improves garden biodiversity around roses without competing for water. In vegetable gardens converted to cut flower rows, yarrow holds straight stems if it grows in lean soil alongside zinnias, gomphrena, and strawflower. When using yarrow in bouquets for informal events, the flat umbels help organize arrangements and make a natural platform for smaller filler blooms, which links it to topics covered in many wedding flowers guide discussions. For fragrance layering, blend yarrow with drought tolerant herbs and classic border staples such as lavender so the foliage textures and colors remain attractive between peak bloom periods.
Air flow matters in design. Space clumps so mature foliage just brushes neighboring plants. That spacing reduces humidity in the canopy and cuts the risk of powdery mildew. Hide post bloom shear marks by interplanting with plants that push fresh leaves through summer. Coreopsis, coneflower, and sedum are classic choices. For a calm scheme built around structural foliage, use gray green yarrow with blue fescue, dwarf yucca, and seed grown annuals that echo its flat flower forms. Where wildlife is a focus, remember that yarrow self seeds modestly in open soil. Leave room at the edges of beds if you want a gentle natural spread, and deadhead promptly where you prefer a crisp line.
References
- NC State Extension Plant Toolbox. “Achillea millefolium common yarrow.”
- Lady Bird Johnson Wildflower Center. “Achillea millefolium.”
- ASPCA Animal Poison Control Center. “Yarrow.”


Written by: Your Flowers Guide editorial team
We are a small independent group of flower lovers who research and review each guide using trusted horticultural and educational sources. Learn more about us