
How to Grow and Care for Canna Lily
Contents
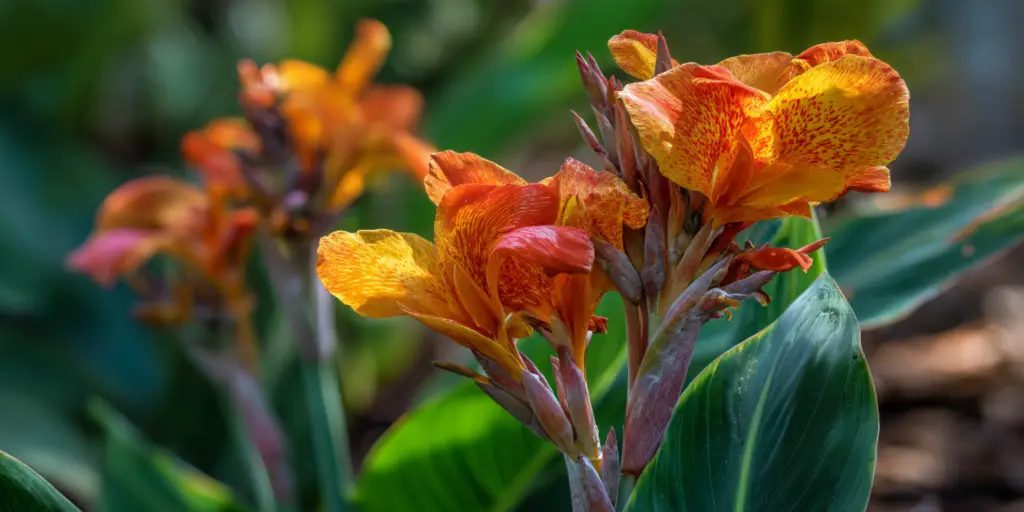
Canna lily are bold, rhizomatous perennials grown for large paddle shaped leaves and showy summer flowers in warm colors. The accepted botanical name for most garden forms is Canna × generalis which represents complex hybrids within the genus Canna. Common names include canna lily and Indian shot. Although the common name includes lily, cannas are not true lilies. For U.S. landscapes, Canna lily care focuses on warm soil, steady moisture, and sun. Plants bloom from midsummer to frost in many regions, with clumps expanding by rhizomes each year where winters are mild. Canna are frost tender. They are reliably hardy in the ground in much of the Deep South and Gulf Coast and are often lifted and stored for winter in colder regions. In most gardens they flower best in full sun with at least six hours of direct light. In hot inland valleys they tolerate light afternoon shade that helps flowers last longer and reduces leaf scorch. Growth is vigorous in long warm seasons with regular water and soil rich in organic matter. Plant healthy rhizomes after danger of frost when the top 6 inches of soil reach about 60 °F. Site them in full sun and prepare a fertile bed with compost and good drainage. Space generously for airflow and feed modestly through the season based on a soil test. In cold regions lift rhizomes after frost blackens foliage and store them at 40 to 50 °F for replanting next spring. With consistent water and warmth, Canna lily care is straightforward for U.S. home gardeners.
Soil & Bed Preparation
Cannas thrive in moisture retentive but not stagnant soil. A loam enriched with two to three inches of finished compost improves fertility and water holding without creating a soggy root zone. In heavy clay, loosen the top 12 to 15 inches with a garden fork before working in organic matter. In very sandy soils, add compost and leaf mold to increase moisture retention. Aim for a crumbly structure that drains freely yet stays evenly moist between waterings. Before planting, run a simple drainage test. Dig a hole 12 inches deep and 12 inches wide. Fill it with water and let it drain, then refill and measure drop in water level after 15 minutes. A percolation rate near 1 to 3 inches per hour is suitable for most ornamentals. Slower than 1 inch per hour calls for amending with organic matter or using a raised bed. Much faster than 3 inches per hour benefits from extra compost to hold moisture. Cannas accept slightly acidic to neutral soil. A practical target is pH 6.0 to 7.0 for general landscape performance. Use a home test or local lab. If pH is low, apply garden lime according to soil test recommendations. If pH is high, elemental sulfur or acid forming fertilizers can nudge it down over time. Always follow local extension guidance for rates. Raised beds warm earlier in spring and improve drainage on compacted or wet sites. They are helpful in cool summer climates where soil warming is slow. In warm regions with porous soil, in ground beds are usually ideal because they buffer moisture better through heat waves. Whichever you choose, keep the bed wide enough for proper spacing and airflow to reduce leaf disease. Cannas grow from rhizomes, which are swollen underground stems with buds called eyes. Rhizomes expand in loose soil that allows oxygen and gentle drying between deep waterings. Avoid dense, airless pockets that hold water around the crown. When preparing the bed, break large clods and remove rocks so eyes and roots can push out easily in spring.

Planting Calendar by USDA Zone
Zones 3 to 6
Treat cannas as tender perennials. Start indoor pots four to six weeks before last frost in a warm bright spot to jump start outdoor bloom. Set rhizomes or hardened transplants outside after the last spring frost when the soil feels warm and night lows consistently hold above 50 °F. In most of these zones that lands in mid to late May. Expect flowering from midsummer to frost. Dig and store rhizomes before the first hard freeze. In high elevation sites with cool nights, site cannas against a south facing wall or paved area that reflects heat to extend the season.
Zone 7
In mild pockets cannas may overwinter with deep mulch, yet survival is not guaranteed each winter. Plant outside from late April to May once soil warms. In humid summer regions scout for leafrollers early. In the southern Appalachians and similar climates with cool nights, start indoors to gain flowering time. Dig and store just after frost for reliable renewal.
Zones 8 to 9
Plant from March to May as soils warm. In the warmest parts of zone 9, you can also set container grown cannas in late winter. Many gardeners leave rhizomes in the ground all year. After frost knocks foliage down, cut stalks to a few inches and mulch three to four inches to buffer winter cold and freeze thaw cycles. In coastal areas shelter plantings from direct salt spray and irrigate with fresh water. In arid interiors, add extra mulch and irrigate more frequently.
Zones 10 to 11
Cannas grow year round and can be planted from late winter to spring. In these zones flowering may pause in cool months and resume in heat. Provide steady moisture and replenish organic matter yearly. Divide clumps every two to three years in late winter to maintain vigor and reduce crowding.
Bare root versus container windows
Rhizomes and divisions go out only after frost danger passes and soil warms. Container grown cannas can be transplanted later into summer if they are well watered and acclimated. In hot deserts, avoid high summer planting of pots because root balls dry too fast. In the Southeast, spring planting lets plants establish before peak pest pressure. For humid Gulf Coast gardens, late winter to early spring planting takes advantage of warm soils and a long growing window.
Regional caveats
Hot humid regions invite fungal leaf spots and caterpillar damage. Space generously and water at soil level. Arid and high desert locations require more frequent irrigation and extra mulch because of wind and low humidity. Along ocean fronts, choose sheltered sites out of direct salt spray and flush foliage with fresh water after storms. In high elevation zones short summer nights slow growth, so prestart indoors to gain flowering time.
Planting: Depth & Spacing
Plant firm, healthy rhizomes with at least one visible eye. Set them 3 to 4 inches deep (7.5 to 10 cm) in average soils. In coarse sand, 4 to 5 inches (10 to 13 cm) helps stabilize new shoots. Place the rhizome horizontally with eyes upward, then cover and water thoroughly to settle soil. Space plants by cultivar size and air movement. Dwarf types can be 12 to 18 inches apart (30 to 45 cm). Standard garden cannas usually need 18 to 24 inches (45 to 60 cm). Tall background types benefit from 24 to 36 inches (60 to 90 cm) to keep leaves dry and reduce disease. For massed plantings, keep rows 24 to 36 inches apart to allow inspection and access. When dividing clumps in late winter or very early spring, cut or break sections so each division has one to three sound eyes and a generous slice of rhizome. Dusting fresh cuts is optional and many gardeners skip it if storage conditions are clean and dry. Replant divisions at the same depths listed above, ensuring firm soil contact all around the piece so buds do not dry out. Water deeply after planting and again a week later to encourage new roots. Transplant potted cannas at the same level they grew in the nursery container. Loosen girdled roots gently. Backfill with native soil improved with compost rather than straight potting mix. Water thoroughly, then add a two to three inch mulch ring, keeping mulch a few inches away from the stems. In bright sun and wind, harden off for seven to ten days by transitioning from part shade to full sun in steps. This reduces leaf scorch and transplant shock. Prewarm the planting hole by soaking with tepid water on cool spring mornings. Plant on an overcast day or in late afternoon. After transplanting, shade new plantings with a temporary board or umbrella for two to three days in hot spells. Check soil moisture every other day until new growth extends.

Watering & Mulching
Cannas want steady moisture from early growth through bloom. After planting, water slowly to soak 8 to 10 inches deep. In average garden soils, supply about 1 inch of water per week from rain and irrigation combined. In lightweight soils or during heat, 1.5 to 2 inches per week may be needed. Drip lines or soaker hoses keep foliage dry, which limits leaf spots and rust. In containers, water whenever the top inch of mix is dry, often daily in midsummer. Once established, cannas tolerate brief dry spells but grow and flower best with regular irrigation. During heat waves above 95 °F (35 °C), increase frequency. Deep morning watering is preferred. Avoid chronic soggy conditions that exclude oxygen from roots, especially in dense clay. If you grow aquatic species or use cannas in a rain garden, introduce plants to shallow standing water gradually after they are rooted and actively growing. Remove them from water before frost to simplify cleanup. Mulch two to three inches with shredded leaves, pine straw, or partially composted bark to moderate soil temperature and reduce evaporation. Keep mulch a few inches away from stalks to prevent constant moisture against the crown. In cold zones, increase mulch to three to four inches after fall cleanup to buffer freeze and thaw cycles that can heave rhizomes. Cannas are not tolerant of salt spray or saline irrigation. In coastal gardens irrigate with fresh water, and rinse foliage with fresh water after storms that blow in salt. In regions with hard water, modest carbonate buildup on leaves is cosmetic. Do not overcorrect with acids. Focus on even soil moisture and healthy soil biology.
Feeding
Begin with a soil test. In fertile beds that receive annual compost, cannas often need only light supplemental feeding. Where soils are lean or when rapid growth is desired, use a balanced, general purpose fertilizer. A practical approach is to apply a balanced garden fertilizer at planting, then feed once or twice more during the season, spacing applications four to six weeks apart. In gardens with very long summers and sandy soils, monthly feeding at a modest rate may be helpful. Always water in thoroughly after any feeding. Cannas respond well to balanced formulations that are not heavy in nitrogen. Ratios such as 10 10 10 or 12 4 8 support steady growth. Slow release products supply a gentle, continuous feed for container plants and windy sites where nutrients leach quickly. Organic options such as composted manures and plant based meals build soil biology and buffer moisture while supplying nutrients across the season. Avoid repeated high nitrogen spikes which push soft growth that invites pests and flops in wind. Aim for at least 3 to 5 percent organic matter in bed soil. Topdress with compost in spring and again lightly after peak bloom if soils are poor. Skip fertilizer if leaves are rich green and flowering is strong, or if a soil test shows adequate nutrients. If growth is lush but flowering is weak, reduce nitrogen and maintain full sun. Retest soil every one to three years, especially in new beds or after heavy mulching programs, so pH and nutrients stay in the target range.
Pruning & Support
In the growing season, remove spent flower spikes back to the next strong leaf to keep clumps tidy and channel energy to new stalks. Deadheading is not strictly required for bloom to continue, yet it improves appearance. After the first frost, cut stalks to two to three inches above the soil. This makes lifting and storage easier in cold zones and reduces overwintering habitat for pests in warm zones. When seed capsules begin to form and petals fade, cut the flowering stem down to a sound leaf junction. Avoid tearing leaves which reduces display. If you want seed for curiosity, leave a few pods on non hybrid species like Canna indica and let the hard seeds mature fully. Standard and tall cannas can reach 4 to 6 feet or more with broad leaves that catch wind. In open or windy sites, stake a few tallest stalks with slim bamboo canes and soft ties tucked behind leaves. For large plantings, a hidden string line supported by perimeter stakes keeps the stand upright. Avoid crowding. Proper spacing is the best long term support. Clean cutting tools before moving between clumps, especially if you have seen streaked or mottled foliage. Scrub off soil, then sanitize blades. A simple method is to dip or wipe with 70 percent isopropyl alcohol. If you use a bleach solution, mix one part bleach to nine parts water, soak blades for several minutes, then rinse and dry to reduce corrosion. Replace solutions frequently and never mix bleach with other cleaners. Scout rolled leaves for caterpillars of the canna leafroller from late spring through summer. If rolls are few, unroll by hand or remove the stalk. In larger gardens apply products labeled for caterpillars and follow extension timing guidance, directing spray into the rolled leaves where larvae hide. Japanese beetles may skeletonize leaves in some regions. Hand pick in the morning into soapy water. Maintain airflow and avoid constant leaf wetting to reduce rust and leaf spots. Plants with severe yellow striping and distorted growth may be virus infected. Remove and discard entire plants and do not compost that material.
Overwintering
Zones 8 to 11 in ground
After frost darkens foliage in zones with a cool season, cut stalks down and mulch three to four inches to insulate rhizomes through winter. In zone 8 sites with occasional hard freezes, deeper mulch plus a site with good air drainage increases survival. In frost free zones, trim spent stalks anytime for tidiness and thin congested clumps in late winter.
Zones 3 to 7 lifting and storage
In colder climates, wait for a light frost to topple foliage. Cut stalks to two to three inches. Loosen the soil several inches from the clump and lift gently to avoid wounding the rhizomes. Shake or brush off excess soil. Cure in a shaded, airy place for a day or two until surfaces are dry to the touch. Store in crates or ventilated boxes filled with barely moist peat moss, vermiculite, or dry wood shavings. Keep at 40 to 50 °F (4 to 10 °C) in a dark, frost free space. Check monthly. Remove any pieces that soften or rot and lightly mist if all pieces become papery dry. Where rodents are a problem, use wire mesh lids and avoid sweet baits in storage areas.
When to remove winter cover
In spring, bring stored rhizomes into a warm room two to three weeks before planting to wake the buds. Replant outdoors after the last frost when the topsoil is warm. Where cannas overwinter in place, pull back extra mulch as new shoots emerge to prevent rot and to warm the crown.
Growing Environments
Cannas grow well in large containers on sunny patios and pool decks. Use a sturdy pot with ample drainage holes. For dwarf selections, a container that holds at least two gallons of mix works. For standard cultivars, start with pots 12 to 16 inches in diameter or larger. Fill with a well draining peat or bark based potting mix. Set rhizomes 3 to 4 inches deep in the mix and water until the entire root zone is evenly moist. Topdress with a slow release fertilizer and monitor water closely in midsummer. A quality commercial potting mix is usually perfect. If you blend your own, combine composted bark or peat based mix with a small portion of perlite for extra aeration. Do not add heavy garden soil to pots because it compacts and sheds water. Elevate large containers on spacers so drain holes stay clear. Cannas love heat but leaves can shred in strong wind. Tuck containers near windbreaks and orient the broadest leaves away from prevailing winds. In hot inner cities use deeper mulch and larger pots that buffer root zones from reflected heat off masonry. In partial shade sites, pick foliage forward cultivars and expect fewer flowers. In coastal gardens out of direct spray, cannas can be striking with sea breeze movement if they receive fresh water irrigation. Species like Canna flaccida and other aquatic cannas adapt to the shallow margins of water gardens. Introduce pots into shallow water only after plants are actively growing, then gradually lower to the desired depth. In northern zones remove containers to dry land before frost for cleanup and storage. Garden hybrids for borders prefer moist soil rather than constant standing water.
Companion Planting & Design
Cannas are natural focal points. Use them as seasonal screens, in island beds, or along fences. When frost is near and foliage declines, companions keep the border attractive. Edge plantings with marigolds, coleus, or compact zinnias that continue into fall. Plant repeat blooming salvias in front for pollinators and color rhythm. Fine textured ornamental grasses make a pleasing contrast to wide leaves. Hummingbirds and bees visit canna blooms, especially red and coral shades. To boost habitat and nectar diversity, weave in salvias, zinnias, and cosmos. Stagger heights so front plants do not shade the canna crowns. Keep 18 to 24 inches of space for airflow around each canna clump to limit leaf disease during humid spells.
References
- University of Minnesota Extension. Calla and canna lilies.
- North Carolina State Extension Gardener Plant Toolbox. Canna × generalis.
- North Carolina State Extension Gardener Plant Toolbox. Canna indica.
- North Carolina State Extension Gardener Plant Toolbox. Canna flaccida.
- Iowa State University Extension and Outreach. Planting and caring for tender perennials.
- Iowa State University Extension and Outreach. Testing and improving soil drainage.
- University of Maryland Extension. Soil health: drainage and improving soil.
- University of Florida IFAS Gardening Solutions. Cannas.
- University of Florida IFAS EDIS. Native Aquatic and Wetland Plants: Golden canna.


Written by: Your Flowers Guide editorial team
We are a small independent group of flower lovers who research and review each guide using trusted horticultural and educational sources. Learn more about us