How to Grow and Care for Delphinium elatum
Contents
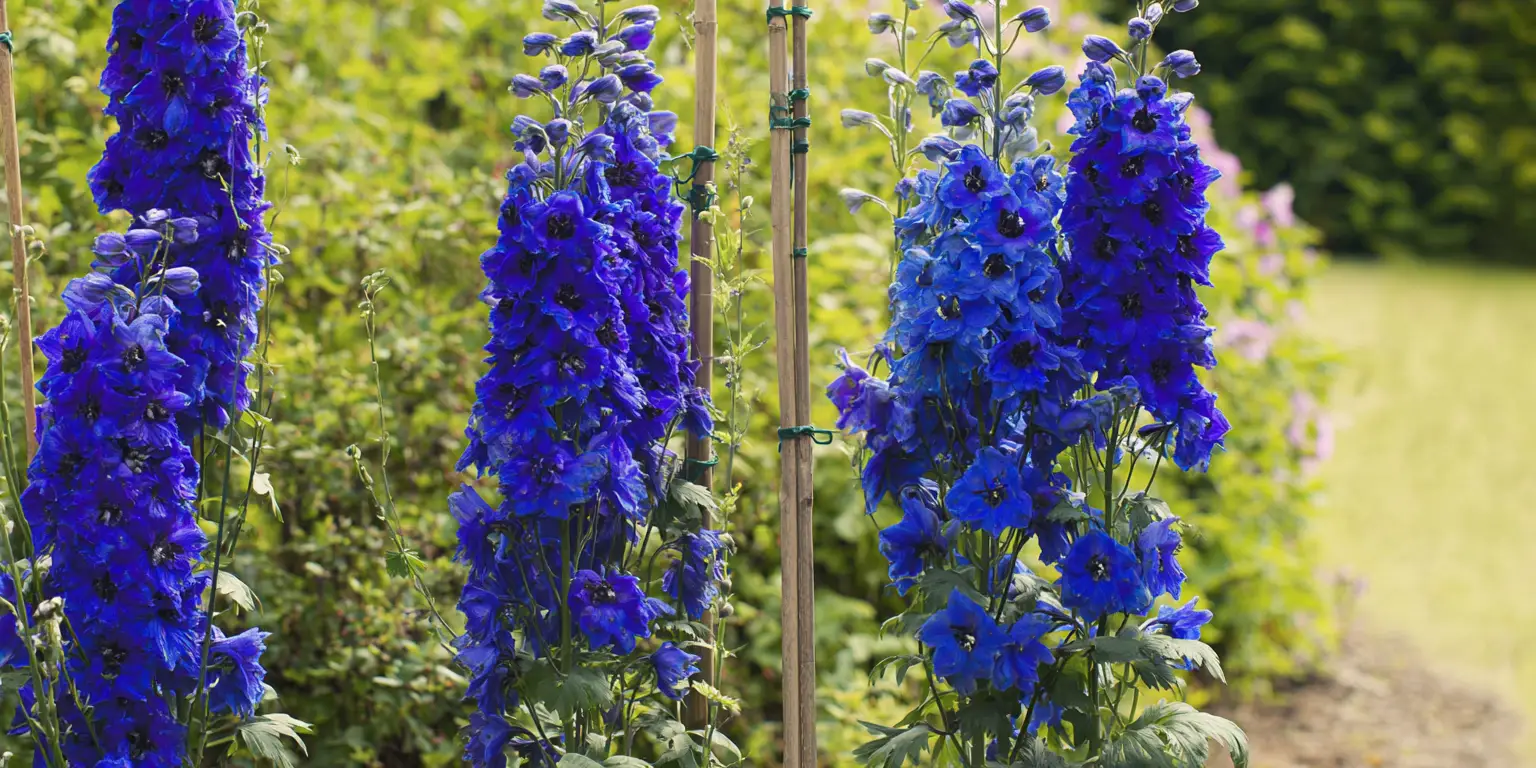
Delphinium elatum is a tall, herbaceous perennial in the buttercup family that sends up dramatic flower spires in shades of blue, purple, pink, and white. In American gardens the name “delphinium” often also covers complex garden hybrids grouped as Delphinium × elatum. You may also see the common name candle larkspur. These plants are beloved for towering, bee‑magnet spikes that transform borders in early to mid‑summer.
Hardiness overview: Classic Delphinium elatum types are reliably hardy in USDA Zones 3 to 7. They thrive where summers are mild and nights are cool. In areas with long, hot, humid summers the plants can be short‑lived and sometimes perform better with afternoon shade and careful siting.
Ideal sunlight: Give full sun in cool‑summer regions. Where heat builds, shift to morning sun with dappled afternoon shade to keep the crown cool and reduce stress. Good air movement without constant wind is ideal.
Snapshot of success: Start with a fertile, well‑drained bed and a soil pH in the slightly acidic to neutral range. Plant at the same depth as in the pot and space generously for airflow. Stake early so stems grow up through their supports. Water deeply during dry spells, mulch with a thin, breathable layer, and deadhead promptly to encourage a smaller second flush. Note that all parts are poisonous if eaten. Keep delphiniums away from livestock and pets and wear gloves if you have sensitive skin.
Soil & Bed Preparation
Texture and drainage: Delphiniums want rich, moisture‑retentive soil that drains freely. Heavy, waterlogged beds invite crown and root rot. Incorporate 2 to 4 inches (5 to 10 cm) of finished compost across the bed and loosen native soil 8 to 10 inches deep (20 to 25 cm). In clay or compacted ground, improve internal drainage with organic matter and consider a raised bed 6 to 8 inches high (15 to 20 cm).
Organic matter targets: Aim for a soil that forms a loose crumb when squeezed. Compost and leaf mold build structure and tilt the water‑to‑air balance toward healthy roots. Avoid raw manure around crowns. A yearly top‑up of compost helps maintain tilth.
pH range: Delphiniums are happy near neutral. A practical target is pH 6.0 to 7.5. If a soil test shows acidity below that range, apply garden lime at label rates. If pH is too high, incorporate elemental sulfur or acidic organic materials and retest in several months. The goal is steady, not drastic, change.
Raised beds vs in‑ground: In cool, well‑drained loams, in‑ground beds are perfect. In slow‑draining sites or where freeze–thaw heaving is chronic, a modest raised bed controls moisture swings and protects crowns. Raised edges also make it easier to anchor stakes and rings for support.

Planting Calendar by USDA Zone
Zones 3 to 4: Plant container‑grown delphiniums in spring as soon as the soil can be worked and the risk of deep freeze has passed. Fall planting is possible in mild autumns if done at least 6 to 8 weeks before the first hard frost. Choose a sheltered site to blunt prevailing winds and consider a thin winter mulch once the ground freezes.
Zones 5 to 6: Spring is prime. Plant from mid‑spring through early summer so roots establish before heat arrives. In many areas you can also plant in early fall. Time fall planting 6 weeks before your average first hard frost so roots knit in before the soil locks up. In Zone 6 with steady fall rains, early September is often the sweet spot.
Zone 7: Favor fall planting. Set transplants in late September to mid‑October, about 6 weeks before first frost, so root systems anchor over winter. Spring planting can succeed in cooler microclimates, but summer heat can stress first‑year plants. Give afternoon shade.
Zones 8 and warmer: In hot‑humid or warm‑winter climates, Delphinium elatum is often grown as a cool‑season annual. Plant in late fall through winter for bloom in late winter to spring, then remove plants when sustained heat arrives. Afternoon shade is usually essential.
Planting: Depth & Spacing
Bulbs or Tubers: Not applicable. Delphinium elatum grows from a crown with buds at or near the soil surface rather than from bulbs, corms, or tubers.
Bare‑Root or Divisions: If you receive dormant divisions or take your own divisions, plant with the crown at the soil surface. Do not bury the crown. Spread roots laterally in a wide hole, backfill with amended native soil, and firm gently to remove air pockets. Water to settle. Space divisions 18 to 24 inches apart (45 to 60 cm) for airflow and support access. In windy corridors, widen spacing to 24 to 30 inches (60 to 75 cm).
Container‑Grown: Water the pot, slide the plant free, and tease circling roots so they grow outward. Set the top of the root ball level with surrounding soil. Planting too deep invites crown rot. Space 18 to 24 inches (45 to 60 cm), with rows 24 to 36 inches apart (60 to 90 cm) if you are massing them in a cutting row. For exhibition spikes, consider single plants 24 inches apart to ease staking and disbudding.
Minimizing transplant shock: Harden off any greenhouse‑grown starts for 7 to 10 days. Begin with 2 hours outdoors out of direct midday sun, then lengthen exposure daily. Transplant on an overcast day or late afternoon. Water thoroughly after planting and keep evenly moist while new roots knit in. A thin mulch helps, but keep it pulled back from the crown.

Watering & Mulching
Establishment vs mature schedules: For the first 3 to 4 weeks after planting, keep the top 6 inches of soil (15 cm) evenly moist. Once established, aim for about 1 inch of total water per week in spring and early summer, counting rainfall. In heat waves above 90 °F (32 °C), increase to 1.5 to 2 inches. Focus on deep, infrequent soakings that wet the root zone 5 to 6 inches deep (13 to 15 cm). Use a rain gauge to know what nature provided.
Delivery and timing: Water at the base, early in the day. Keep foliage dry to discourage mildew and leaf spots. Soaker hoses or drip lines are ideal in delphinium beds and save water while leaving leaves dry.
Mulch choices and thickness: After planting, apply 1 to 2 inches (2.5 to 5 cm) of shredded leaves, pine straw, or fine bark to the root zone. Keep mulch 2 to 3 inches (5 to 7.5 cm) away from the crown to prevent rot and vole hiding places. In hot regions, a light summer mulch keeps roots cool. In windy, arid sites, mulch reduces evaporation and soil crusting.
Avoiding crown or root rot: The key is drainage first, then watering discipline. Do not heap mulch on the crown. Avoid constantly wet soils and never plant deeper than the existing soil line on the root ball. If your soil drains slowly, grow on a low mound or raised bed and water less often but more deeply.
Special cases: In containers, expect to water more often in heat since pots dry faster. Choose a potting mix that drains well and bears the weight of tall stakes without tipping. In drought or hose bans, prioritize morning shade, mulch, and wind protection to reduce stress.
Feeding
How much and when: Delphiniums are hungry compared with many perennials, but more is not always better. In rich soils with regular compost, a single light feeding in early spring is usually enough. Where fertility is modest, apply a balanced, slow‑release fertilizer in early spring at rates that supply about 0.1 to 0.25 pound of actual nitrogen per 100 square feet. If growth pales or stalls, a light side‑dress in late spring can help.
N‑P‑K guidance: For general beds without a soil test, a complete fertilizer in the 5‑10‑5 to 10‑10‑10 range works well at conservative rates. Organic options with similar nutrient ratios are also suitable. If a lab report shows high phosphorus, switch to a low‑P formulation and rely on compost plus nitrogen‑potassium to avoid runoff issues.
Soil biology pointers: Building organic matter is the best long‑term “fertilizer.” Two inches of compost worked in during bed prep sets a strong baseline. Avoid frequent high‑nitrogen quick‑release products which push soft growth prone to lodging and disease. Retest soil every couple of years to adjust inputs and avoid creeping imbalances.
When to skip fertilizer: Well‑grown clumps in loamy beds that receive annual compost often do not need additional fertilizer. If stems are lush but floppy with reduced bloom, you have likely overfed. Pull back the next season and lean on compost.
Pruning & Support
Seasonal clean‑ups: In spring, remove winter mulch from around crowns as the soil warms and new shoots appear. Thin weak or crowded shoots on mature clumps, leaving five to seven of the strongest to channel energy into taller, thicker stems. After the first flowering, cut spent spikes down to the basal leaves to encourage a late summer to early fall rebloom where weather permits.
Deadheading specifics: For cut‑flower quality, remove side buds to produce a larger, showier central spike. For more total bloom, leave side buds in place and simply remove the central spike once it fades. Either approach benefits from prompt cutting back to clean foliage after the first flush.
Structural support: Stake early while stems are 12 to 18 inches tall (30 to 45 cm). Use stout bamboo canes, rebar, or ring supports and soft ties. Space supports just outside the crown so new shoots can rise through the framework. In very windy sites, a three‑stake triangle around each clump with twine ties offers unobtrusive insurance against snapping in summer storms.
Tool hygiene: Clean and disinfect pruners and knives between plants, especially if you have removed diseased tissue. Wipe with 70 percent isopropyl alcohol or use a fresh 10 percent bleach solution, then dry and oil tools. Clean tools reduce the risk of spreading fungal and bacterial problems through the border.
Overwintering
Mulch strategy: After several hard frosts, cut stems to a few inches above the crown and apply a winter mulch to moderate freeze-thaw cycles. Use 2 to 4 inches (5 to 10 cm) of airy material such as pine straw or shredded leaves. The aim is insulation, not warmth. Do not mulch until the ground has cooled and begun to freeze. In spring, pull mulch back from crowns as soon as growth resumes.
Freeze-thaw management: In snow‑light winters with alternating thaws, crowns can heave. A timely winter mulch helps keep soil temperatures steadier. If you see a crown lift during a January thaw, gently firm it back and re‑mulch when the soil is workable, or wait until a safer window to avoid damage.
Rodent protection: Thick winter mulch can shelter voles. Keep mulch pulled back 2 to 3 inches (5 to 7.5 cm) from the crown. Where vole pressure is high, set traps in runways outside the bed or use hardware‑cloth guards around prized clumps during winter.
When to remove winter cover: As soon as the soil thaws and new shoots are an inch or two high, remove or thin the mulch, leaving a light summer layer to conserve moisture. Reinstall stakes early.
Growing Environments
Containers: You can grow delphiniums in large, heavy containers, although in many climates they do better in the ground. Choose a pot at least 12 to 16 inches wide (30 to 40 cm) with ample drain holes. Fill with a high‑quality peat‑ or bark‑based potting mix amended with compost for water‑holding capacity and a little perlite for drainage. One plant per pot simplifies staking. Site where wind is reduced and afternoon sun is softened in warm regions. Water and feed more often than in‑ground plantings, and anchor stakes in the container wall or soil before stems elongate.
Potting mix and drainage: Avoid garden soil in pots. Use a soilless mix that drains quickly yet holds moisture. Add a thin top‑dress of compost in spring, then mulch lightly to reduce surface drying. Never allow water to stand in saucers.
Microclimates: Delphiniums dislike constant wind and reflected heat. Plant on the east side of a fence or hedge for morning sun and some afternoon relief in hot zones. In cool climates, a south‑facing bed near a stone wall captures early warmth while the wall breaks gusts. Avoid low pockets where cold air ponds and frost lingers.
Companion Planting & Design
Design partners: Tall delphiniums are unforgettable rising behind mounded perennials and shrubs. Pair with roses for a classic cottage mix or with hydrangea macrophylla where shade allows. Early bloomers like peonies bridge to delphiniums, while later perennials such as phlox and daylily fill the gap after midsummer. For structure and spring scent, nearby lilacs make a wonderful seasonal bookend. Thread in lavender and Nepeta to knit the border and feed pollinators while their silver leaves contrast the delphinium’s bold spires.
Color planning: Lean into the cool spectrum for harmony, or set the spires against warm foils like rudbeckias and yarrow. If you are building a color‑themed bed, dip into our guides on blue flowers, purple flowers, and white flowers for complementary choices, and browse types of flowers for year‑round companions. If you design for events, the wedding flowers guide helps assemble palettes that photograph beautifully with delphinium’s satin blooms.
Hiding dieback and extending color: After the first flush, you may cut hard for rebloom, which briefly reduces height. Plant airy companions like gaura or ornamental grasses in front to mask the transition. Stagger bloom times so there is never a bare moment: spring bulbs and violas up front, delphiniums at peak in early summer, then midsummer coneflowers and late salvias carry color forward.
Spacing and airflow: Resist crowding. Delphiniums need space for stake placement and drying breezes. Keep neighboring foliage a few inches off the delphinium’s stems and avoid overhead irrigation among tight plantings. Good spacing is your best disease prevention.
References
- Missouri Botanical Garden – Delphinium elatum Plant Finde
- Missouri Botanical Garden – Pacific Hybrid Delphiniums
- North Carolina State University Cooperative Extension – Delphinium elatum Plant Toolbox
Written by: Your Flowers Guide editorial team
We are a small independent group of flower lovers who research and review each guide using trusted horticultural and educational sources. Learn more about us