How to Grow and Care for Snowdrop
Contents
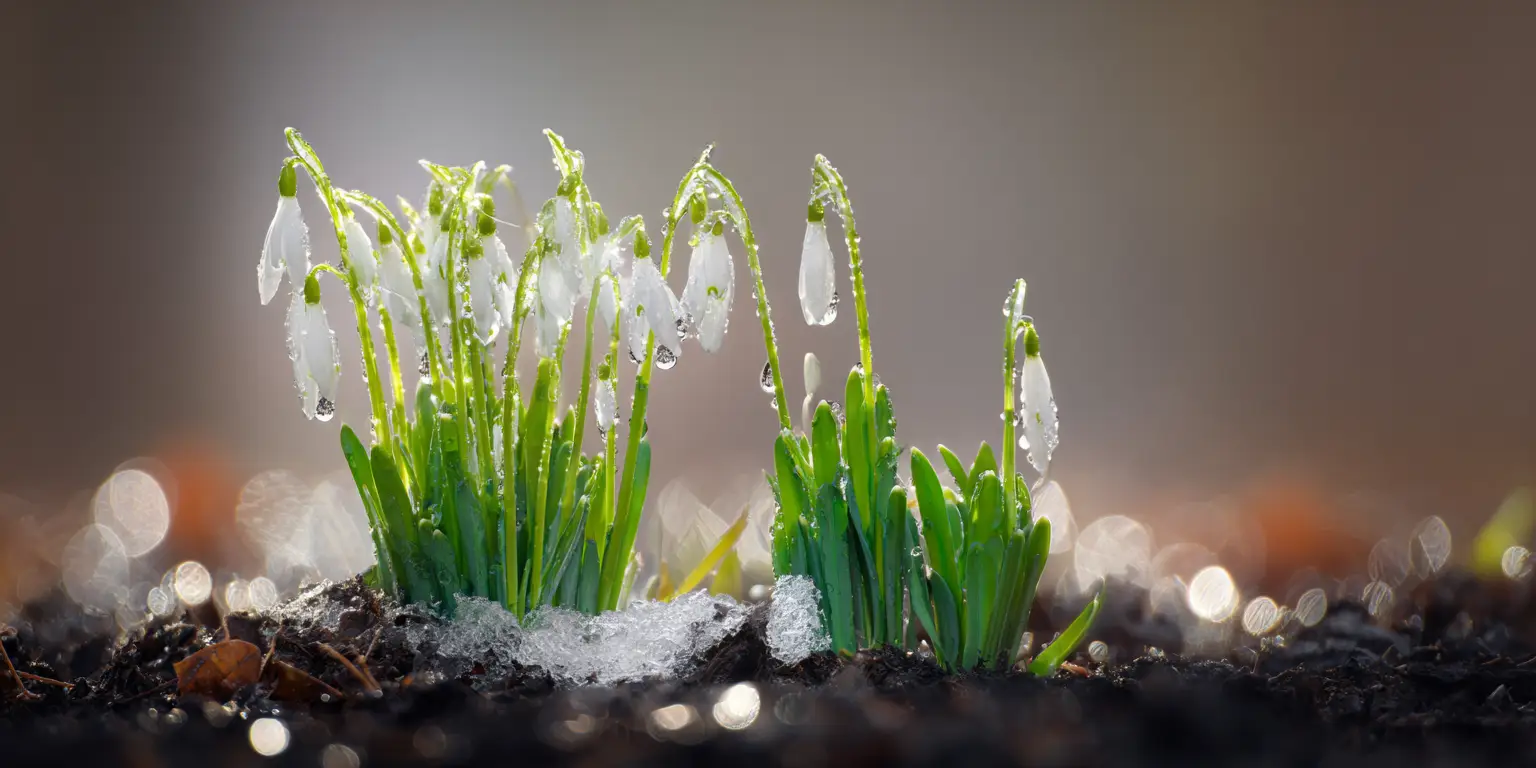
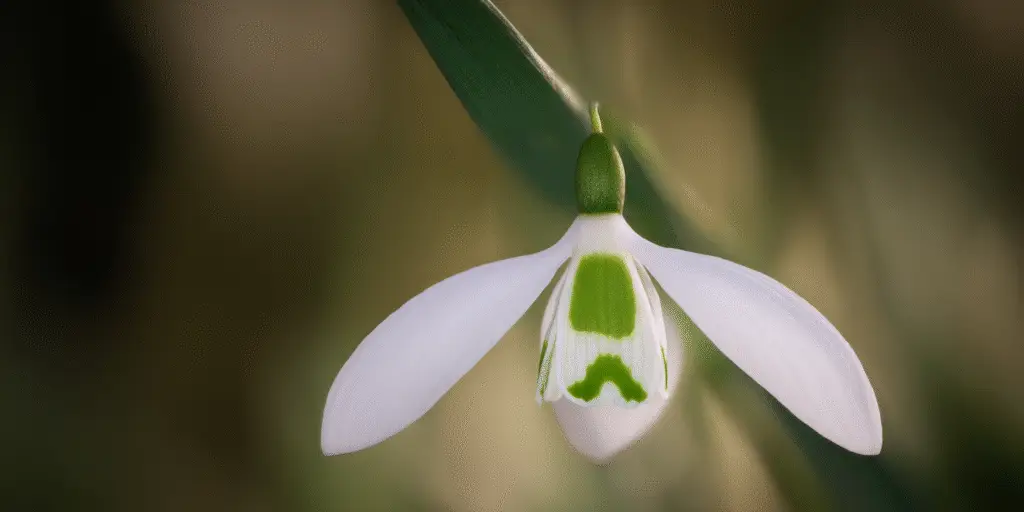
Snowdrops are small, early spring bulbs prized for nodding white flowers that bloom while winter still lingers. The accepted botanical name of the common snowdrop is Galanthus nivalis in the Amaryllidaceae family. Gardeners also grow related species such as Galanthus elwesii and Galanthus woronowii, which are similar in care but slightly larger or broader leaved. Flowers are usually white with green markings, carried above narrow gray green leaves. Most clumps stand 4 to 6 inches tall (10 to 15 centimeters) and spread slowly into drifts over time. Snowdrops are best known for flowering before most plants wake up, so they are perfect for edging paths and naturalizing under deciduous trees where they can shine before the canopy leafs out.
Snowdrops are hardy perennials for much of the United States, typically thriving in USDA Zones 3 to 8 where winters are cool. They prefer full sun in late winter and early spring before trees leaf out, then light to moderate shade in summer. The ideal site is a deciduous woodland edge or beneath shrubs where soil stays cool and evenly moist. If you garden in a warm summer climate, give snowdrops morning sun and afternoon shade so bulbs do not overheat during dormancy. In all regions, choose soil that drains well after rain to protect bulbs from rot. Their small scale makes them useful near steps and entries where you can enjoy flowers up close.
Plant fresh, firm bulbs promptly in fall. Set them at the correct depth with sharp drainage and ample organic matter. Keep moisture steady from fall rooting through spring bloom, then let soil dry slightly during summer rest. Do not remove leaves until they yellow on their own, since foliage feeds bulbs for next year. With these simple steps, Snowdrop care is straightforward and very rewarding for U.S. home gardeners.
Soil & Bed Preparation
Snowdrops prefer a friable, well drained loam that holds moisture without staying waterlogged. Blend in two to three inches of compost or leaf mold across the bed to improve tilth and moisture balance. Clay soil benefits from extra coarse material such as pine fines or horticultural grit to open pore space. Very sandy soil benefits from more organic matter to hold moisture through spring bloom. Avoid low spots where meltwater collects. If you have consistently wet soil in winter, build a slightly raised bed to lift bulbs above saturation. Good drainage is the single most important soil factor for reliable Snowdrop care.
Drainage Test and pH Targets
Check drainage before planting. Dig a hole about 12 inches deep and 12 inches wide. Fill it with water and let it drain. Refill it once more. If the second fill drains within 4 hours, drainage is acceptable. If water lingers longer, loosen the soil further with organic matter and grit, or choose a raised bed. For pH, aim for slightly acidic to neutral soil, about 6.0 to 7.0. If a soil test shows pH below target, apply garden lime at the labeled rate. If pH is high, elemental sulfur can nudge it down. Always follow a current soil test rather than guessing, and retest every few years if you make changes.
Bulb specific prep and bed style
Because snowdrops are bulbs, aeration matters. Work the top 8 to 10 inches so roots can move easily. In heavy soil, a two to three inch layer of sharp sand or grit at the planting depth can help water pass through the bulb zone. Beds tucked beneath deciduous trees are excellent, since falling leaves provide natural mulch that breaks down into humus. In deep shade that stays dry in summer, add compost to hold moisture through spring growth. Raised beds warm and drain earlier, which helps early bloom, while in-ground beds hold coolth longer in summer dormancy. Choose the style that balances spring moisture with summer dryness in your climate.

Planting Calendar by USDA Zone
Zones 3 to 4
In cold regions, plant snowdrop bulbs from early September to early October, roughly 6 to 8 weeks before the ground freezes. This window lets roots form while soil is still workable. Plant earlier rather than later in these zones, since a sudden hard freeze can shut down root growth. Site bulbs where snow cover is common, because snow acts as insulation that moderates freeze to thaw cycles. If you garden where fall is very short, consider ordering bulbs early so you can plant as soon as they arrive in good condition.
Zones 5 to 6
In the central belt of the country, prime planting runs from late September through October. The goal is the same: allow generous root growth before the soil turns cold. In wetter fall periods, watch drainage closely and avoid compacting the bed by working soil when saturated. In humid regions, choose beds that get a few hours of direct sun in late winter to help dry leaves after rain. Where clay dominates, consider a shallow raised ribbon along paths to ensure bulbs never sit in water. Spring planted potted snowdrops can be set out after bloom, but fall is still the preferred time for best establishment.
Zones 7 to 8 and coastal or high elevation notes
In warmer winter areas, plant later in the season. Late October through November is typical, and in mild Zone 8 you can often plant into December if the soil remains cool. Pick a spot with morning sun and bright shade later, such as the east side of a fence or beneath high branched trees. Choose species or selections that tolerate warmer winters, such as Galanthus elwesii, and water steadily through winter dry spells. Along warm coasts and in parts of Zone 9 with little winter chill, snowdrops are more challenging. Treat them like specialty bulbs in containers that you can cool and protect, or trial them in the coolest microclimate you have, such as a north facing bed.
Planting: Depth & Spacing
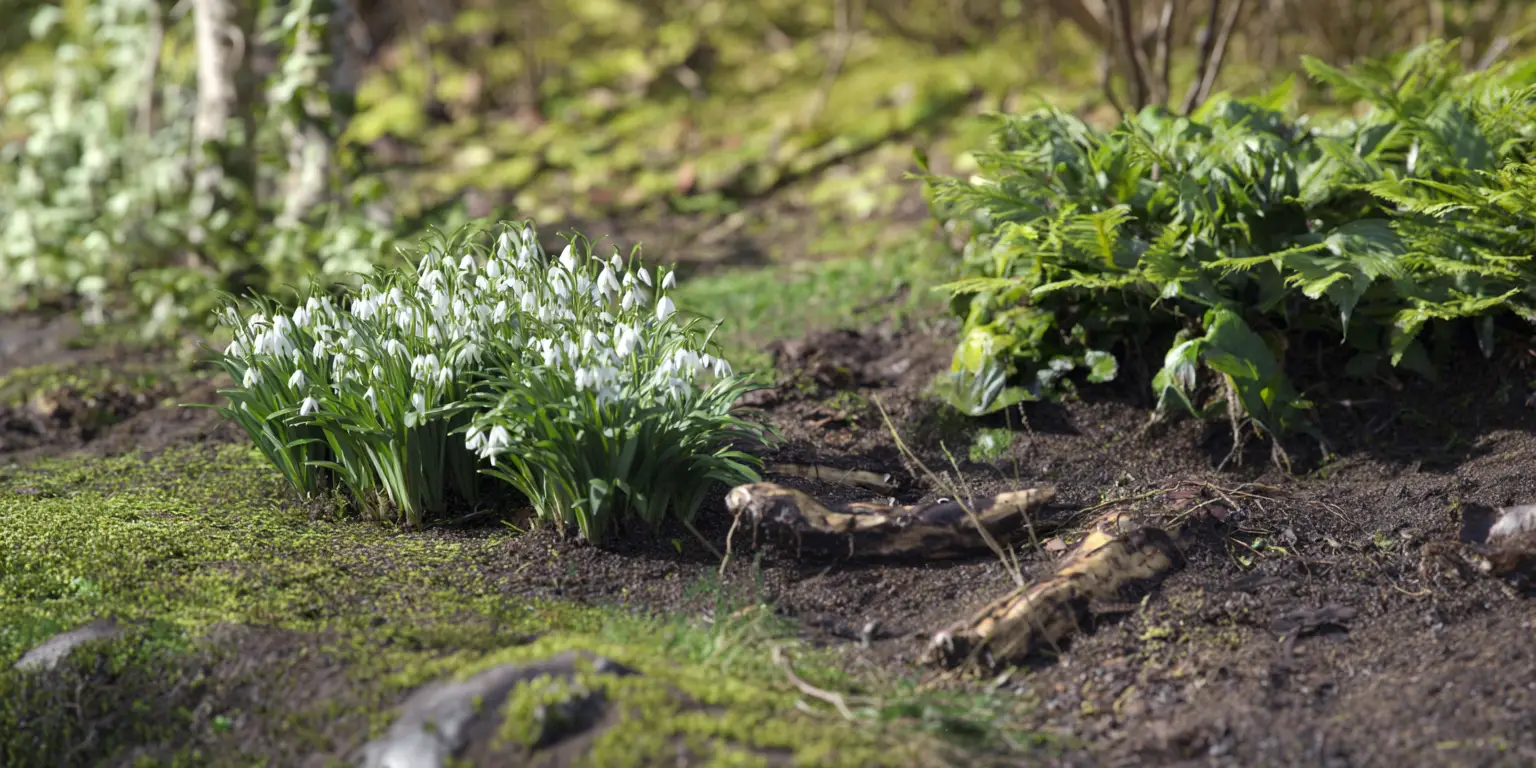
Plant snowdrop bulbs promptly after purchase while they are still firm. Set bulbs with the pointed tip up. A simple rule is to cover the bulb with soil to a depth equal to about three times its height, which for snowdrops is usually 2 to 3 inches of soil above the bulb nose (5 to 8 centimeters). Space bulbs 3 to 4 inches apart in clusters for a natural look, or closer at 2 to 3 inches if you want an instant patch. Water thoroughly after planting to settle soil around roots. For naturalizing, tuck small groups of 5 to 7 bulbs in irregular drifts rather than straight rows so blooms appear more woodland like.
Bare root divisions
Dividing established clumps works best just after flowering while leaves are still green. Lift a clump carefully with a digging fork, tease the bulbs apart into small fans, and replant immediately at the same depth they were growing. Keep roots shaded and moist while you work, and water well to eliminate air pockets. Temporary shade from a board or fabric for a day can reduce transplant stress on sunny sites. Divisions settle quickly and often resume blooming the following spring, since foliage keeps feeding bulbs after replanting.
Container grown plants
If you buy snowdrops in pots, plant them at the same depth they are growing in the container so the crown sits level with surrounding soil. Loosen the root ball lightly to encourage outward growth. Water thoroughly after setting the plant, then monitor moisture for the next few weeks, since container grown roots can be slow to transition into native soil. If plants were grown under a nursery shade structure, acclimate them over several days to brighter late winter sun to avoid leaf scorch.
Watering & Mulching
Right after planting in fall, water deeply to settle soil and encourage new roots. In most climates, fall rains will carry bulbs into winter with little extra care. Check moisture during prolonged dry spells and irrigate if the top few inches of soil are dry. In spring, keep soil evenly moist from bud emergence through bloom and while leaves remain green. Mature clumps need less attention once established, but even established plantings benefit from a deep soak during an unusually dry late winter or early spring. Good Snowdrop care focuses on consistent moisture when bulbs are active, not during summer rest.
Mulch types and thickness
Mulch conserves moisture, moderates temperature, and feeds soil life. A 1 to 2 inch layer of shredded leaves, leaf mold, or fine compost applied after the soil cools in fall is ideal. Keep mulch a finger width back from emerging shoots in late winter to avoid trapping excess moisture around the neck of the bulb. Coarse bark mulches can be used around shrubs, but a finer textured mulch is better directly over small bulbs so stems can push through easily. Top up mulch each fall as it breaks down. Mulch is especially helpful in raised beds that dry faster.
Heat spikes, drought, and water quality
If a warm spell arrives in late winter, watch moisture more closely. Warm dry winds can desiccate the shallow root zone even when nights are cool. Water in the morning so foliage dries by evening. In long spring droughts, a deep soak once each week is usually enough on loam. Sandy soils may need more frequent but still deep watering to reach the bulb zone. Hard water is not usually a concern for snowdrops, but avoid watering that splashes soil onto leaves during extended wet spells, since a constantly wet leaf surface encourages foliar disease.
Feeding
Many snowdrop plantings bloom well for years with no fertilizer if the soil is rich in organic matter. Where a soil test shows low fertility, a light application of a low nitrogen bulb fertilizer can help. Aim for a product in the general 5 to 10 to 10 range and use the label’s lightest rate. Apply once in fall as roots form and again right after bloom while leaves are green. Avoid high nitrogen fertilizers that push soft leaf growth at the expense of bulb and flower. Compost worked into the bed in fall is often the best long term nutrient strategy.
Soil biology and when to skip fertilizer
Healthy bulbs depend on living soil. Feed the soil with organic matter each year rather than chasing quick results from soluble nutrients. If you have dark, friable soil and strong bloom, skip fertilizer entirely. Recheck soil pH and nutrients every two to three years if you are adjusting with lime or sulfur. In containers, use a potting mix with slow release fertilizer already blended in at a modest rate, and refresh the top two inches with compost each fall.
Pruning & Support
After flowers fade, you can remove the spent stems to keep clumps tidy. If you want plants to naturalize by seed, allow some seedpods to mature before cutting. The most important rule is to keep foliage in place until it yellows and flops, usually four to six weeks after bloom. Those leaves are the power plant that loads carbohydrates back into the bulbs for next year’s display. Do not braid or knot leaves, since that reduces surface area for photosynthesis and can trap moisture.
Support and tool hygiene
Snowdrops are short and rarely need staking. Heavy wet snow may flatten plants temporarily, but most clumps spring back without harm. Keep tools clean when dividing or deadheading to limit disease spread. Wipe blades with a cloth dampened with 70 percent alcohol between clumps. Divide congested patches every three to five years to maintain vigor, either just after bloom while foliage is green or in early fall before root growth resumes.
Overwintering
In very cold areas where soil heaves during freeze to thaw cycles, a protective mulch helps keep bulbs stable. Once the ground has frozen lightly, add 2 inches of shredded leaves or similar fine mulch over the bed. Snow itself is a superb insulator, so do not remove it unless weight will break branches above. Pull winter mulch back as shoots emerge in late winter so stems are not forced to stretch. Where winters are windy and dry, a mulch blanket also reduces desiccation of shallow surface roots.
Rodent protection and containers
Snowdrop bulbs contain natural alkaloids that most rodents avoid, but squirrels sometimes dig in bulb beds out of curiosity. A simple wire mesh bulb cage or a sheet of hardware cloth set just below the soil surface stops digging. Container plantings need extra care, because pots freeze harder than ground soil. In Zones 3 to 6, overwinter outdoor pots where they will not be saturated by rain, such as against a north wall, or move them into an unheated garage that stays roughly 35 to 45 °F (2 to 7 °C). Check moisture once a month and water lightly if the potting mix is dry.
Growing Environments
Snowdrops grow very well in containers that are deep enough to protect the bulbs. An 8 to 10 inch wide pot that is at least 8 inches deep works for a tight display of 10 to 15 bulbs. Use a free draining mix such as two parts high quality potting mix to one part coarse perlite or horticultural grit. Make sure the container has open drainage holes and use a saucer only during establishment, removing it once plants are rooted. After bloom, let leaves ripen and then move the pot to bright shade for summer dormancy. Resume watering with the first cool nights of fall.
Microclimate tips for shade, wind, and reflected heat
Under deciduous trees, snowdrops receive full light in late winter and gentle shade later, which is ideal. On exposed sites, cold winter wind is less of a problem than dry soil. Along warm south or west walls, reflected heat can push plants out of sync with the season. If you only have a warm wall to use, add extra mulch in fall and water during winter dry spells to keep soil temperatures even. North and east exposures are the most forgiving in Zones 7 to 8.
Companion Planting & Design
Because snowdrop leaves disappear by early summer, plan companions that leaf out as snowdrops finish. Good partners include epimedium, heuchera, hosta, hardy geranium, and woodland ferns. Shrubs such as lilacs provide a deciduous canopy that shelters bulbs in summer while allowing bright light in late winter. For a classic early bulb mix, weave snowdrops with daffodils and tulips so the sequence runs from late winter through mid spring. Adding blue minor bulbs such as scilla or glory of the snow reinforces the cool palette and strengthens the display.
Pollinator friendly options and spacing for airflow
Snowdrops open early pollen and nectar to foraging insects on mild days, so they pair well with crocus, winter aconite, and hellebores to support pollinators through the shoulder season. When naturalizing in lawns, choose areas you can leave unmown until leaves yellow. Space bulbs closely for effect but allow a few inches between clusters so air can move through the planting after rain. In shady borders, layer snowdrops at the front where flowers can be seen up close, then let later perennials rise behind to disguise fading foliage.
Design notes and how to use site anchors
Drifts look most natural when scattered in gentle curves rather than planted as straight lines. Tuck small groups along paths where you will pass on late winter mornings. For container displays by the door, group three pots at different heights for interest. If you are planning a broader display, browse topics like types of flowers to map seasonal layers and color families. Snowdrops fit naturally into white flowers schemes and combine beautifully with early blue flowers. For spring holiday arrangements or intimate events, review the wedding flowers guide for ideas on harvesting and conditioning small bulbs for short lived floral work.


Written by: Your Flowers Guide editorial team
We are a small independent group of flower lovers who research and review each guide using trusted horticultural and educational sources. Learn more about us