How to Grow and Care for
Contents
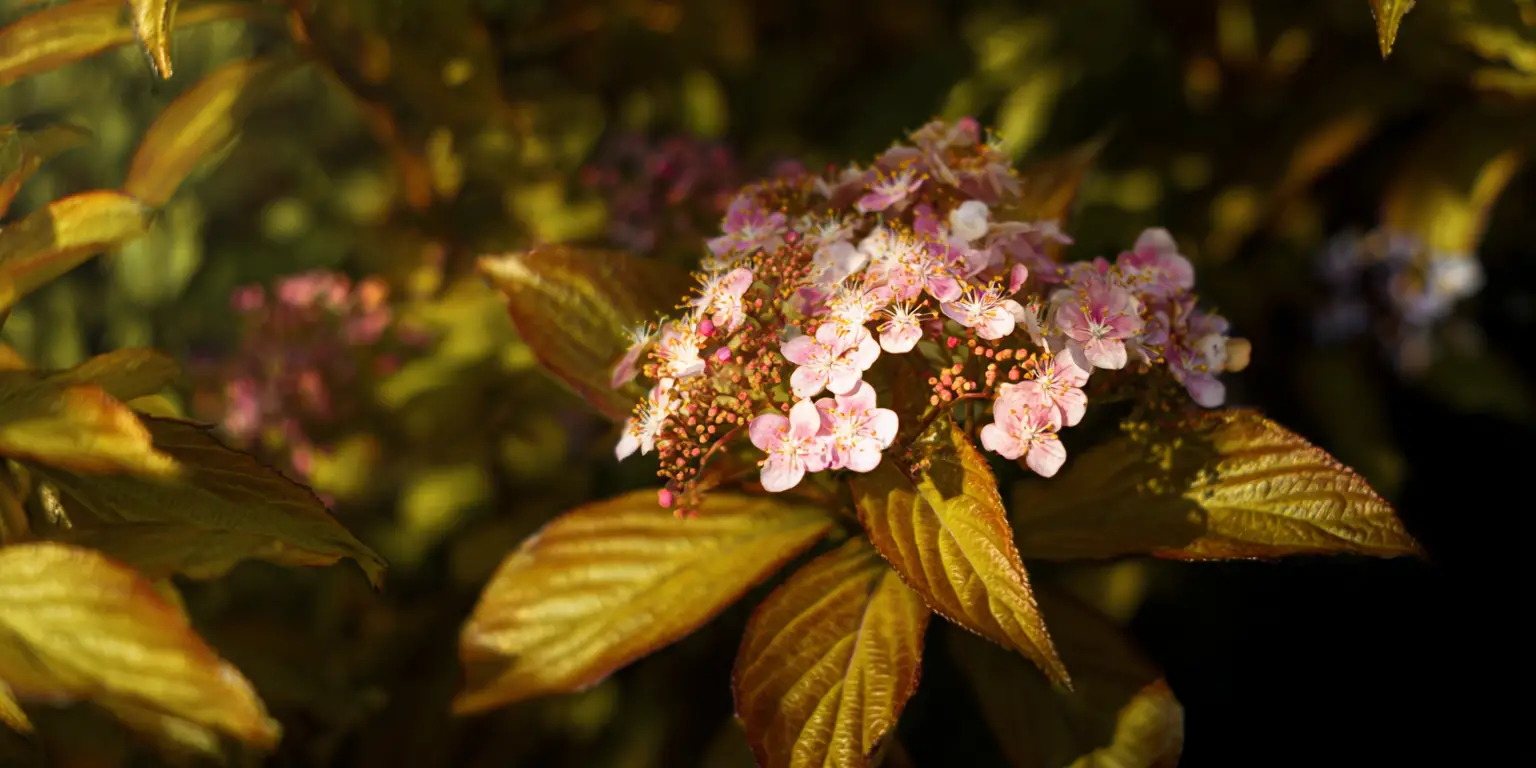
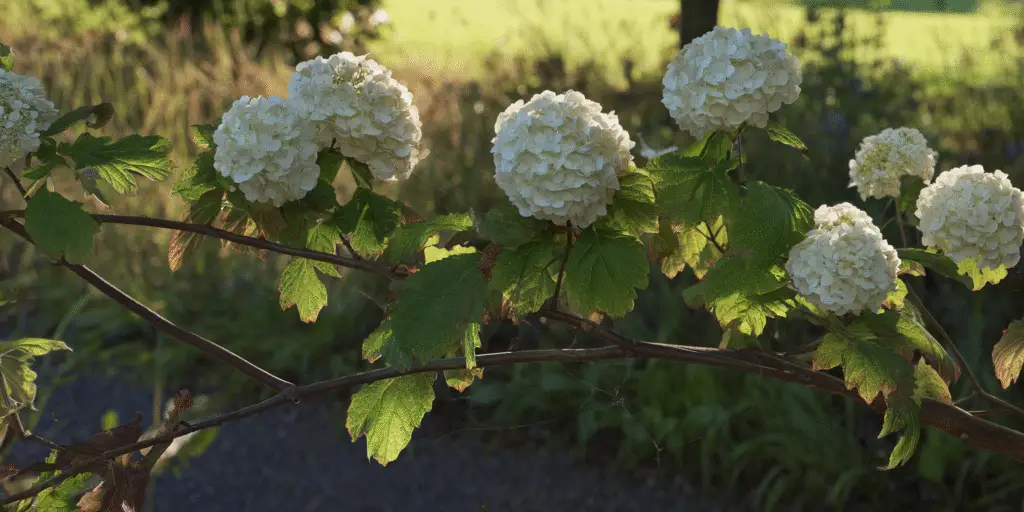
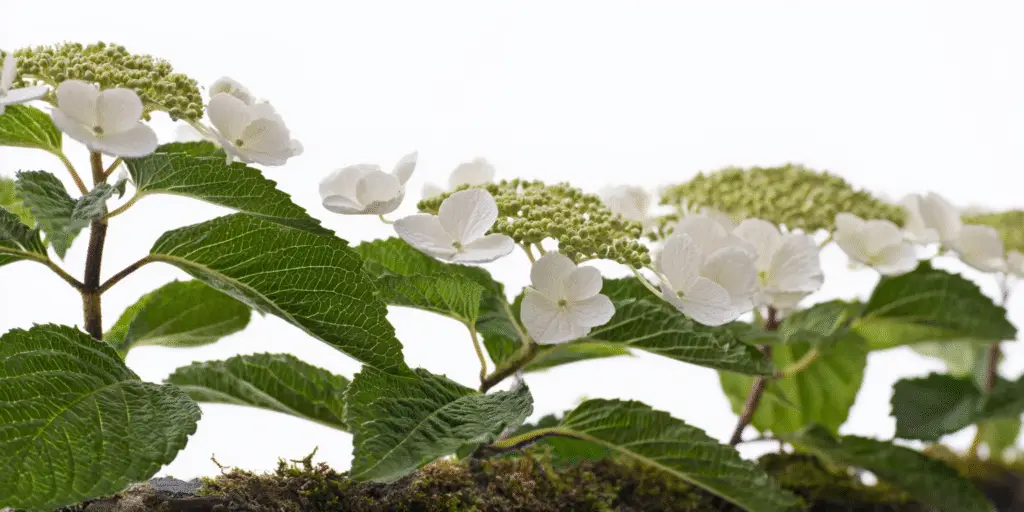
Viburnum is a genus of ornamental shrubs in the Adoxaceae family, cultivated for fragrant white to pink spring flowers, clusters of showy berries in shades of red to black, and often rich fall foliage. You will see the botanical name written as Viburnum spp. because this guide covers multiple species commonly grown in the United States. Popular garden species include Viburnum carlesii called Korean spice viburnum, Viburnum plicatum f. tomentosum called doublefile viburnum, Viburnum dentatum called arrowwood viburnum, Viburnum opulus called European cranberrybush viburnum, the North American taxon often sold as Viburnum trilobum or Viburnum opulus var. americanum called American cranberrybush, Viburnum nudum and Viburnum tinus. These shrubs range from compact mounded forms to large, upright screens.
Hardiness overview
Because Viburnum is a broad genus, hardiness varies. Many hardy deciduous species thrive in USDA Zones 4 to 7 and some into Zone 3 with protection. A number of evergreen or semi evergreen species grow best in Zones 7 to 9 and into Zone 10 in frost free pockets. Always match species to your winter lows and summer heat. If you garden in the Upper Midwest or Northern New England, choose the hardy deciduous types. If you are in the Southeast or Pacific Coast, evergreen species may fit well.
Ideal sunlight
Most garden viburnums flower and fruit best in full sun to partial shade. Aim for 6 hours of direct light where possible. In hot summer regions, afternoon shade protects leaves and reduces water stress. In the Upper South and Texas, consider a site with morning sun and filtered light later in the day. Dense shade reduces bloom and fruit and encourages leaf diseases.
Snapshot of success
Start with a healthy container grown plant or a fresh dormant bare root shrub. Plant in soil that drains well yet holds steady moisture. Set the crown at grade and water deeply and consistently through the first growing season. Apply a wide mulch ring and keep it pulled back from stems. Prune lightly after bloom on spring bloomers or in late winter on summer bloomers. With these basics, Viburnum care becomes routine and your shrubs will repay you with bloom, fruit, and structure that anchors the border.
Soil & Bed Preparation
Viburnums prefer loam or loam with some clay. The goal is soil that drains freely yet does not dry out too fast. On sandy sites, add organic matter to improve water holding. On heavy clay, loosen a broad area and consider a slight berm or raised bed to improve aeration. Avoid compacted subsoil that traps water around the root zone. Puddling or standing water after rain signals the need for grading or raised planting.
pH range
Most landscape viburnums accept slightly acidic to neutral soil. A target of pH 5.5 to 7.0 sets you up for good nutrient availability. Some species tolerate slightly alkaline conditions near 7.5, but high pH can cause leaf yellowing with green veins called iron chlorosis. If you garden on limestone soils or irrigate with alkaline water, choose tolerant species and emphasize organic matter to buffer swings in pH.
How to test and correct
Test soil pH and fertility before planting. Use a cooperative extension test kit or laboratory service. If pH is high, incorporate elemental sulfur at rates recommended by your test to gently lower pH over time. If pH is low, add finely ground limestone at the tested rate. Correct drainage first, then fertilize based on results. For structure and soil biology, mix 2 to 3 inches of compost into the top 8 to 10 inches of the planting zone over a broad area that extends beyond the mature dripline. Avoid amending only the hole because that can create a bathtub that holds water.
Raised beds vs in ground
Raised beds are helpful on flat, poorly drained sites and in cold regions where soil warms slowly. A low berm 6 to 8 inches high built with native soil blended with compost improves aeration and root development. In well drained native soils, in ground planting is best and simpler. Avoid deep planting in raised beds. Keep the crown at grade with the final bed surface.
Drainage Test and pH Targets
Dig a hole 12 inches wide and 12 inches deep. Fill with water and let it drain completely. Fill again and time the drainage. A second fill that drains in 2 to 4 hours is ideal. More than 8 hours indicates poor drainage. Remedy with grading, a broader planting area, or a low berm rather than adding gravel in the hole. Confirm pH with a lab test and set your goal near pH 6.0 for most species. Retest soil every 2 to 3 years if you adjust pH or change irrigation water.

Planting Calendar by USDA Zone
Zones 3 to 4
Short growing seasons favor spring planting. Set container grown or balled and burlapped shrubs in the ground from snow melt to bud break when the soil is workable, often April to early May. Bare root shrubs should be planted very early in spring while still dormant, often late March to April, then watered carefully during establishment. Fall planting is risky in these zones since young roots may not harden before freeze. If you must plant in fall, do it at least 6 to 8 weeks before the first expected hard freeze and mulch generously.
Zones 5 to 6
Both early fall and spring work well. Many gardeners prefer early fall from late September to October because soil is warm and roots grow until consistent frost. Spring planting is also fine from April to mid May as soon as the ground can be worked. Plant bare root shrubs only in early spring while dormant. In windy sites or exposed ridges, favor spring planting to avoid winter heaving.
Zones 7 to 8
Plant in fall once nights cool and soil temperatures drop, often October to November. In the Deep South and coastal plain, winter planting continues into December and January during mild spells when soil is workable. Spring planting is possible from February to March. Avoid late spring through early summer when heat arrives quickly and increases transplant stress. Evergreen species benefit from fall planting so they can root before summer.
Zones 9 to 10
Only a subset of heat tolerant species is suitable. Plant in late fall through winter during your cool season, typically November to February. Avoid late spring and summer starts. Coastal gardeners should allow for wind and salt exposure and irrigate during winter dry spells. In desert rim or arid valleys, use filtered afternoon shade and drip irrigation. Soil temperatures remain high even in winter, so monitor moisture closely after planting.
Regional caveats
Hot and humid regions demand good airflow and more space between shrubs. Arid regions require irrigation lines laid at planting and a thicker mulch to reduce evaporation. Coastal regions often have alkaline irrigation water that can raise pH and cause chlorosis over time. High elevation gardens experience freeze and thaw cycles that heave new plants. In those settings, plant in spring or very early fall, add a broad mulch ring, and check for heaving after cold snaps.
Planting: Depth & Spacing
Keep bare roots cool and moist from delivery to planting day. Hydrate roots in a clean bucket of room temperature water for 30 to 60 minutes before planting. Dig a wide hole only as deep as the distance from the root collar to the root tips, usually 10 to 14 inches for young stock. Create a small cone of soil in the center and drape roots evenly. Set the root collar level with the final soil surface. Backfill with native soil broken fine, firming gently to remove air pockets. Water thoroughly to settle soil, then add more backfill if needed. Mulch a wide ring 2 to 3 inches deep and keep mulch 3 inches back from stems. Stake only if winds rock the plant. Remove stakes after the first growing season.
Container grown shrubs
Slide the plant from the pot and inspect roots. If roots circle the outside of the root ball, make four vertical slices one half inch deep from top to bottom and tease roots outward. This encourages new roots to grow into native soil. Dig a hole 2 to 3 times as wide as the root ball and just as deep. Set the top of the root ball level with the surrounding soil. Do not bury the top of the root ball. Backfill with native soil and firm gently. Water slowly until the top 6 to 8 inches of soil is moist. Add a wide mulch ring of shredded bark or pine straw 2 to 3 inches deep, keeping it pulled back from stems to prevent rot.
Balled and burlapped shrubs
Set the root ball in the hole so the top sits level with grade. Once positioned, cut and remove all twine and pull back burlap from the top and sides. If wire baskets are present, remove the top one third after the shrub is stable in the hole. Backfill with native soil, firm gently, water to settle, then finish backfilling. The goal is perfect root to soil contact without burying the root flare.
Spacing for airflow and growth
Match spacing to mature width. Compact species and selections are often 5 to 7 feet wide. Large species can reach 8 to 12 feet or more. A safe general rule is 6 to 8 feet between medium shrubs and 10 to 12 feet for large ones. Allow extra space on the windward side in humid regions where airflow limits leaf spot. For hedges, set plants 3 to 5 feet apart for dense screens with smaller species, or 6 to 8 feet apart for large hedges. Row spacing in larger plantings should allow you to walk and mulch easily which is often 6 to 10 feet between rows.
Transplant shock and acclimation
Water deeply right after planting and again 2 to 3 days later. Shade new shrubs with a temporary fabric on the hottest west side in bright, hot climates for the first two weeks. Do not fertilize at planting. Keep soil consistently moist through the first summer. A slow trickle soaker hose for 30 to 45 minutes is better than frequent light splashes. Remove any wrapping, labels, or ties that cut into bark. Check that mulch has not been piled against stems.

Watering & Mulching
The first year sets the root system. During the first 6 to 8 weeks, water twice each week in the absence of rain. Apply enough water to moisten soil 6 to 8 inches deep which is often 5 to 10 gallons per shrub depending on plant size and soil texture. After that period, water once each week during dry spells until fall. In subsequent years, most viburnums need about 1 inch of water per week which equals about 0.6 gallons per square foot of root zone. Sandy soils require more frequent, smaller irrigations. Clay soils need slower, deeper soaks.
Mulch types and thickness
Mulch is essential for moisture conservation and root health. Use shredded hardwood, pine bark, pine straw, or arborist chips. Spread 2 to 3 inches thick and extend the ring as wide as the canopy. Keep mulch 3 inches away from stems to avoid rot and vole damage. Refresh the layer each spring after soil warms. In dry climates, a 3 to 4 inch layer can be helpful if your soil drains freely.
Preventing crown or root rot
Rot begins when mulch is piled against stems or when shrubs sit in waterlogged sites. Keep the root flare visible at the soil surface. Do not add soil or mulch over the root ball after planting. If you inherited a shrub planted too deep, carefully remove soil from the top until you expose the root flare, then mulch correctly. Adjust irrigation to match weather. A moisture meter or a simple hand test works. Check at 4 inches depth. If the soil feels cool and moist, wait to water. If it is dry and crumbly, irrigate.
Heat spikes and drought
During heat waves above 95°F (35°C), water in the early morning to fill the soil reservoir before midday. Shade fabric on the west side lowers stress for new shrubs. In prolonged drought, reduce evaporative stress with a wider mulch ring and avoid pruning or fertilizing which drive new growth you cannot support with water. Slight wilting in late afternoon can be normal. Consistent morning wilting or dull, grayish foliage signals the need to irrigate.
Water quality notes
Hard water with high bicarbonates can nudge soil pH upward over time. If you notice leaf yellowing with green veins on species that prefer acidic conditions, test soil pH and consider using captured rainwater for supplemental irrigation. Where salinity is a concern near coasts or on reclaimed water, leach salts occasionally by watering deeply until some water drains from the root zone.
Feeding
Viburnums are moderate feeders. Skip fertilizer at planting and through the first growing season unless a soil test shows a specific deficiency. Beginning the second spring, apply a light dose of balanced slow release fertilizer once a year in early spring as shoots begin to elongate. Follow the label rate for shrubs and spread it over the root zone, not against stems. In many gardens a product in the general 5 to 3 to 3 to 10 to 10 to 10 range works because you are feeding the soil as much as the plant. In warm climates with long seasons, a second lighter application after bloom can be useful if growth is pale and slow.
Organic options
Compost, leaf mold, and well aged bark fines rebuild soil structure and feed soil organisms that support roots. A topdressing of 1 inch of compost under the mulch once a year is an excellent baseline practice. Organic granular fertilizers in the 4 to 3 to 4 to 5 to 5 to 5 range work well for steady feeding when applied in spring at label rates. Water after feeding so nutrients move into the upper root zone.
When to skip fertilizer
Do not fertilize late in summer or fall. Late nitrogen pushes tender growth that can be injured by early frost. Skip fertilizer altogether if a soil test shows adequate levels and your shrubs have rich green leaves and seasonal extension growth of 6 to 12 inches. Excess fertilizer makes lush shoots that are more prone to aphids and leaf spots.
Soil biology reminders
Aim for at least 5 percent organic matter in the top 6 inches of soil in most gardens. Re test soil every 2 to 3 years if you adjust pH or change water sources. Healthy soil biology buffers pH and improves resilience during heat and drought.
Pruning & Support
Remove winter damaged twigs in early spring before growth resumes. On spring blooming viburnums that set flower buds the previous summer, make any size shaping cuts right after bloom. On later blooming viburnums that flower in early summer on new wood in your region, prune in late winter. If you are unsure which you have, observe bloom timing for one cycle before making major cuts. Light thinning is safer than heavy shearing.
How to prune
Viburnums look best with a natural outline. Avoid repeated shearing that ruins flower bud set and invites pests. Use thinning cuts back to a branch union to open the canopy and improve airflow. For a mature shrub, remove up to one third of the oldest stems at ground level every 2 or 3 years. This rejuvenation keeps the base vigorous and improves flowering. Deadhead is optional. Many gardeners leave spent flowers to develop fruit clusters that feed birds and add fall color.
Structural support
Most viburnums do not need long term staking. Newly planted tall specimens may benefit from a single low stake for one season on windy sites. Use a soft, flexible tie and check monthly. Remove stakes after the first growing season. For espalier forms against a wall, use sturdy wires and plan on occasional tie in work as shoots extend.
Tool hygiene
Clean pruners before moving between shrubs to limit disease spread. A quick dip or wipe with 70 percent isopropyl alcohol works well. Keep blades sharp so cuts heal quickly and do not crush tissue. Discard prunings that show obvious disease. Do not compost diseased leaves if your home compost does not reach consistently high temperatures.
Overwintering
Winter success starts with mulch. In cold regions, pull mulch away from stems in late fall to discourage rodents, then replace it with a fresh ring 3 to 4 inches thick when the ground begins to freeze. This insulates the soil and slows freeze and thaw cycles that heave roots. In spring, rake back mulch slightly to allow soil to warm, then spread it evenly again once growth begins.
Freeze and thaw management
Freeze and thaw is a bigger hazard than persistent cold in many regions. Check new shrubs after cold snaps for any lifting. If the root ball heaves, step it gently back into place on a thawed day and water to resettle soil. Re mulch and consider wind protection for the remainder of that winter.
Rodent protection
In regions with voles or rabbits, use a cylinder of quarter inch hardware cloth around stems for winter. Set it 2 to 3 inches away from stems and tall enough to stay above snow. Remove in spring to avoid constricting growth. Keep mulch pulled back from stems to reduce hiding places.
Evergreen and container care
Evergreen species are prone to winter leaf scorch from cold, wind, and sun. Plant out of prevailing winter winds and avoid southern exposures that warm leaves on sunny winter days. Water evergreens during winter thaws if the soil is dry since roots can dehydrate even when leaves are not growing. For container grown viburnums in cold zones, move pots into an unheated but sheltered space that stays roughly 25 to 40°F which is minus 4 to 4°C. Water sparingly during winter so the root ball does not fully dry. In mild zones, group containers together against a wall, wrap pots with insulating material, and avoid saucers that hold water.
Growing Environments
Small viburnums can live for years in large containers. Choose a pot with drainage holes that is at least 18 to 24 inches wide and 16 to 20 inches deep for compact selections. Large species need even larger containers which is 24 to 30 inches or more. Use a high quality soilless mix that drains well and contains pine bark or perlite. Avoid straight garden soil in pots. Elevate containers on pot feet to keep drainage holes open.
Drainage and potting mix
Blend a peat or coir based potting mix with 10 to 20 percent fine pine bark for structure. Water until you see a small flow from the drainage holes, then stop. In the first year, monitor more often since containers dry faster than garden soil. Top up the potting mix in spring if it has settled. Refresh the top 2 inches with new mix or compost and replace 20 to 30 percent of the mix every 2 to 3 years to maintain vigor.
Microclimate tips
Site selection is a powerful tool. Use east facing exposure for lush bloom in hot regions. Avoid reflected heat from south and west masonry. Tuck shrubs behind a fence or hedge to break winter wind. In coastal gardens, shelter shrubs from constant salt spray. In canyon or high wind corridors, choose a lower growing species and give it extra space. In the shade of mature trees, ensure at least half a day of direct light for good flower and fruit.
Companion Planting & Design
Viburnums play well with many shrubs and perennials. Pair with spring bulbs at the dripline for early sparkle. Underplant with woodland perennials like foamflower and Solomon’s seal in dappled light. Combine with summer flowering shrubs such as spirea or smaller hydrangeas to carry color after spring bloom. In sunny borders, thread in daylilies and coneflowers to bridge from late spring into summer. In partial shade gardens, hostas and ferns provide texture that sets off the rounded habit of a viburnum.
Pollinator and wildlife value
Viburnum flowers attract a range of early bees and beneficial flies. Many species set heavy fruit that feeds birds in late summer and fall. For reliable fruit set, plant two genetically different selections of the same species that bloom at the same time. Spacing shrubs with ample airflow improves pollinator traffic and leaf health. If fruit drop is messy on a path, choose fruiting species for lawn edges or naturalized corners instead.
Spacing for airflow and garden health
Air movement lowers humidity around leaves and reduces foliar disease. In humid regions, leave a bit more room than the nursery tag suggests. Mixed borders that include shrubs of different heights and textures also promote airflow. Place viburnums slightly back from tight walls or fences so the rear foliage does not stay wet after rain.
References
- Clemson University Cooperative Extension. Viburnum.
- The Morton Arboretum. Plant advice: Viburnum.


Written by: Your Flowers Guide editorial team
We are a small independent group of flower lovers who research and review each guide using trusted horticultural and educational sources. Learn more about us